
User Manual


4
EN
First Flight Preparation
• Remove and inspect contents
• Begin charging the fl ight battery
• Program your computer transmitter
• Install the fl ight battery in the helicopter
(once it has been fully charged)
• Bind your transmitter
• Familiarize yourself with the controls
• Find a suitable area for fl ying
Flying Checklist
❏ Always turn the transmitter on fi rst
❏ Plug the fl ight battery into the lead from the ESC
❏ Allow the receiver and ESC to initialize and arm properly
❏ Fly the model
❏ Land the model
❏ Unplug the fl ight battery from the ESC
❏ Always turn the transmitter off last
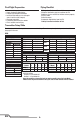
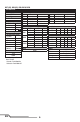
Transmitter Setup Table
D/R & Expo
Chan Sw Pos D/R Expo
AILE
0 100 +25
1 75 +25
ELEV
0 100 +25
1 75 +25
RUDD
0 100 +25
1 75 +25
Mix 1
GYRO->GYRO ACT
Rate D+125% U+125%
SW ELE D/R TRIM – INH
Timer
Down Timer 5:00
Switch THR CUT
ADJUST LISTSETUP LIST
DX6i
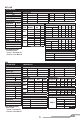
Throttle Curve
Switch Pos
(F Mode)
Pos
1
Pos
2
Pos
3
Pos
4
Pos
5
NORM 0 25 50 75 100
STUNT 80 80 80 80 80
TRAVEL ADJ
Channel Travel
THRO 100/100
AILE 100/100
ELEV 100/100
RUDD 100/100
GYRO 100/100
PITC 100/100
REVERSE
Channel Direction
THRO N
AILE N
ELEV N
RUDD N
GYRO N
PITC R
GYRO
RATE SW-F.MODE
0 88% NORM 0
1 12% STUNT 1
Modulation Type
AUTO DSMX-ENABLE
D/R COMBI
D/R SW AILE
Model Type
HELI
Swash Type
1 servo Normal
Pitch Curve
Switch Pos
(F Mode)
Pos
1
Pos
2
Pos
3
Pos
4
Pos
5
NORM 30 40 50 75 100
STUNT 0 25 50 75 100
HOLD 25 37 50 75 100
Panic Mode Operation
ELEV D/R Switch
Sw Pos 0 = Panic Mode Off
Sw Pos 1 = Panic Mode On
Once the model has returned to level you must manually return the Panic Mode
Switch to the off position otherwise the cyclic and tail rotor controls will be reduced.
The rates given in the following tables are recommended settings. The values may be adjusted up or down to suit the
fl ying style of the user.