
User Manual


15
EN
Calibration Procedure
If the Blade 250 CFX is experiencing drift issues after completing the trim fl ight procedure located at
www.bladehelis.com, perform the following calibration. The calibration procedure may also be needed
following crash repairs.
WARNING: Before beginning the calibration procedure, disconnect the main motor and tail motor leads to
prevent accidental motor startup during calibration.
To perform the calibration procedure:
1. Ensure the surface used for calibration is level.
2. Power on the transmitter and helicopter, allowing them
to initialize.
3. Turn Throttle Hold ON.
4. Ensure the main motor and tail motor leads are
disconnected. Set the fl ight mode switch to Intermediate
Mode (FM1).
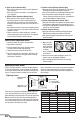
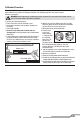
5. Using a bubble level as shown below, level the helicopter
by placing the Blade 250 CFX foam blade holder under
the tail fi n. Use additional items, as necessary, to build up
under the tail fi n until the tail boom is level.
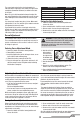
6. Hold the left stick to the bottom right corner, the right
stick to the upper left corner and press the bind button
until the LED on the receiver fl ashes once.
7. Release both sticks and the bind button.
8. The LED on the
receiver will
remain solid for
1-2 minutes while
the calibration
takes place. Do
not move the
helicopter until the calibration is completed.
If the LED begins blinking rapidly, an error has
occurred. Begin the calibration procedure again,
starting with step 1.
9. After the calibration is successfully completed, the receiver
LED will blink slowly (2 seconds on, 2 seconds off).
10. Power the helicopter off.
11. Reconnect the main motor and tail motor wires.
12. Perform the trim fl ight procedure as shown in the Advanced
Settings Addendum available at www.bladehelis.com.
13. During subsequent fl ights after the trim fl ight, the helicopter
should return to within 5 degrees of level consistently.
Bubble level
Foam blade holder