
230 S V2 Manual


16
EN
Trim Flight
Perform this procedure if the model is not performing well or
has been recently rebuilt from a crash.
The trim fl ight procedure was performed during the factory
test fl ight and only needs to be performed if you notice the
model is not returning to level consistently or if the model
does not remain still during stationary pirouettes.
The trim fl ight is used to determine the optimal settings for
SAFE
®
technology during fl ight.
The trim fl ight must be performed in calm conditions.
Entering Trim Flight Mode
1. Lower the throttle stick to the lowest position.
2. Center all trims. For the included Spektrum DXe
transmitter (RTF only), the trims are centered when
you hear a higher pitched beep while pressing the
trim button. Move the trim in both directions until you
hear the high-pitched beep.
3. Power ON the transmitter.
4. Install the fl ight battery in the helicopter.
5. Connect the battery connector to the ESC.
6. Place the helicopter on a fl at surface and leave it still
until the motor beeps twice and the blue ESC LED
glows solid, indicating initialization is complete.
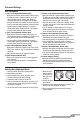
7. Place the helicopter where you are going to take off.
8. Move and hold
the left stick
to the bottom
left corner and
the right stick
to the top left
corner as shown.
9. Activate Panic Recovery until the swashplate rotates
around once.
10. Release the sticks and deactivate panic recovery.
11. The model is ready for the trim fl ight.
Performing the Trim Flight
1. Slowly increase the throttle to lift the model into a
stationary hover. Make corrections as necessary
to keep the model still. Evaluation does not begin
until the throttle stick is over 50% and the sticks are
centered. Making corrections will not affect the result
but a longer fl ight may be necessary.
2. Keep the model stationary in a hover for 120 seconds.
Sliding and slow movements are okay. The main goal
is to keep the rotor disk level.
3. Once you are satisfi ed with the trim fl ight, land the model.
Exiting Trim Flight Mode
1. After landing, lower the throttle stick to the lowest
position.
2. Activate Panic Recovery for 2 seconds, or until the
swashplate moves, indicating the servo positions and
attitude values have been recorded and trim fl ight
mode has been exited.
Flight Test
After performing the trim fl ight, test-fl y the model to evalu-
ate the leveling characteristics.
• The model should return to level fl ight consistently.
• During takeoff, the model should lift off with minimal
corrections.
• During a hover, the control stick should remain close to
center. Small corrections are acceptable.
If the model performs poorly or does not level properly after
the trim fl ight, retry the entire trim fl ight procedure. If the
problem persists, inspect the model for damaged compo-
nents, a bent shaft or anything that may result in increased
vibration. The trim fl ight may not record the correct values
due to excessive vibration, fl ying in wind or the model
not staying level. In these cases, shorter trim fl ights may
be necessary. If you are still experiencing problems after
several attempts please perform the calibration procedure
and try the trim fl ight procedure again.