
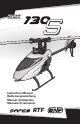
130 S Manual

9
EN
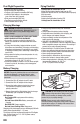
1. Lower the throttle stick to the lowest position.
2. Power ON the transmitter.
3. Center all trims. For the included MLP6 transmitter
(RTF only), the trims are centered when you hear a
longer tone while pressing the trim button. Move the
trim in both directions until you hear the long tone.
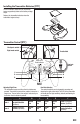
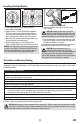
4. Attach the hook material to the helicopter frame and
the loop material to the fl ight battery.
5. Install the fl ight battery on the helicopter frame.
Secure the fl ight battery with the hook and loop strap.
NOTICE: If the fl ight battery hook and loop strap is pulled
too tight, it may result in a vibration or the tail rotor may
drift to the right during fl ight. If you experience either of
these issues, loosen the strap slightly and fl y again.
6. Connect the battery connector to the ESC, noting
correct polarity.
CAUTION: Connecting the battery to the ESC
with reversed polarity will cause damage to the
ESC, the battery or both. Damage caused by incorrectly
connecting the battery is not covered under warranty.
7. Place the helicopter on a fl at surface and leave it still
until the ESC beeps and the receiver LED glows solid,
indicating initialization is complete.
If you experience issues during initialization, refer to the
Troubleshooting Guide at the back of the manual.
CAUTION: Always disconnect the Li-Po
battery from the aircraft when not fl ying to
avoid over-discharging the battery. Batteries discharged
to a voltage lower than the lowest approved voltage
may become damaged, resulting in loss of performance
and potential fi re when batteries are charged.
Installing the Flight Battery
1 2
3
This product requires an approved Spektrum DSM2
®
/DSMX
®
compatible transmitter. Visit www.bindnfl y.com for a
complete list of approved transmitters. Your RTF transmitter comes prebound to the model. If you need to re-bind, follow
the directions below.
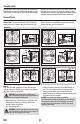
General Binding Procedure
1. Disconnect the fl ight battery from the helicopter.
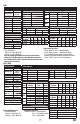
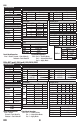
2. If you are not using the transmitter included with the RTF version of the helicopter, refer to the Transmitter Setup
Table to correctly program your transmitter.
3. Lower the throttle stick to the lowest position. Set all trims to the center position while the transmitter is on.
4. Power off the transmitter and move all switches to the 0 position. Move the throttle to the low/off position.
5. Install the bind plug in the bind port extension.
6. Connect the fl ight battery to the ESC. The receiver LED fl ashes, indicating it is in bind mode.
7. Po wer on the transmitter in bind mode.
To enter bind mode in the RTF transmitter, press and hold the bind switch while powering on the transmitter.
The transmitter will beep and the LED will blink. Release the bind switch.
8. The helicopter is bound when the LED on the receiver turns solid.
9. Disconnect the fl ight battery, remove the bind plug and power the transmitter off.
CAUTION: When using a Futaba
®
transmitter with a Spektrum™ DSM2
®
module, you must reverse the throttle
channel and re-bind. Refer to your Spektrum module manual for binding and failsafe instructions. Refer to your
Futaba transmitter manual for instructions on reversing the throttle channel.
If you encounter problems, obey binding instructions and refer to the troubleshooting guide for other instructions.
If needed, contact the appropriate Horizon Product Support offi ce.
Transmitter and Receiver Binding