DMC200 User Guide DMS(Driver Monitoring System) Cloud Dashcam with Driver Monitoring System
BLACKVUE DMC200 For manuals, customer support and FAQs go to www.blackvue.
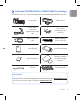
ENGLISH ENGLISH In the box (DR750X DMS Plus / DR900X DMS Plus Package) Check the box for each of the following items before installing the BlackVue dashcam.
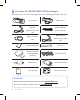
In the box (For DR750X DMS LTE Plus Package) Check the box for each of the following items before installing the BlackVue dashcam.
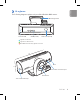
ENGLISH ENGLISH At a glance The following diagrams explain each part of the BlackVue DMS camera.
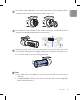
Install and power up Install the front camera behind the rear view mirror. Install the DMS camera on the driver‘s dashboard or front windshield. Remove any foreign matter and clean and dry the installation area before setup. Front camera DMS camera Note y Depending on the mounting position of the product, DMS functions may not operate normally. Warning y Do not install the product in a location where it can obstruct the driver's field of vision.
Peel off the protective film from the double-sided tape and attach the front camera to the windshield behind the rear-view mirror. Adjust the angle of the lens by rotating the body of the front camera. We recommend pointing the lens slightly downwards (≈10° below horizontal), so as to record video with a 6:4 road to background ratio. Note y Recorded videos from DMS are saved to the microSD card on the front dashcam.
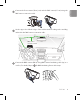
Adjust the angle of the lens by rotating body of DMS and mounting bracket and peel off the double-sided tape. Attach the DMS camera to the windshield or dashboard. Attach the DMS camera to the windshield or dashboard. GOOD GOOD BEST BEST GOOD Windshield Installation GOOD Dashboard Installation Note y For best accuracy of DMS, install the DMS camera in the recommended area.
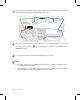
Use the pry tool to lift the edges of the rubber window sealing and or molding and tuck in the DMS camera connection cable. DMS camera connection cable Connect the DMS camera (DC in) using DMS camera hardwiring cable (2p) to a car fuse, For details, Skip to for DMS Hardwiring Power cable setup. DMC200 9 ENGLISH ENGLISH Connect the front camera ('Rear' port) and the DMS camera(‘V’ out) using the DMS camera connection cable.
Use the pry tool to lift the edges of the rubber window sealing and or molding and tuck in the DMS camera Hardwiring power cable. DMS camera Hardwiring cable DMS camera connection cable Power cord cable Plug the cigarette lighter power cable into the cigarette lighter socket and the front camera. Skip to for Hardwiring Power Cable setup (DR750X Plus, DR900X Plus only). Locate the fuse box to connect the hardwiring power cable. Note y Location of the fuse box differ by manufacturer or model.
After removing fuse panel cover, find a fuse that powers on when engine is turned on (ex. cigarette lighter socket, audio, etc) and another fuse that remains powered on after the engine is turned off (ex. hazard light, interior light). Connect the ACC+ cable to a fuse that powers on after engine start (Front camera hardwiring cable (3p)) and BATT+ cable to a fuse that remains powered on after engine is turned off (Front camera hardwiring cable (3p) + DMS camera hardwiring cable (2p)).
DMS Calibration Why do we need calibration? To utilize AI-based DMS features, calibration process must be preceded to enable DMS. The calibration process is intended to improve the accuracy of driver recognition since driver's physical condition (height and eye size), driving position vary from person to person. Complete installation DMS camera and Front camera Turn on the engine, DMS booting up Adjust the camera angle if necessary to ensure the driver's head is within the camera.
ENGLISH ENGLISH Driver Monitoring System Features Functions Descriptions Indicator LED Power On When power is turned on, the DMS booting up. (Blinking) Detected Detects the face within the range of 15 degree to top, bottom, left and right based on the center of the lens. X Undetected When driver is out of detection range for 60 seconds, it will be detected as No driver. O Drowsy When driver’s eyes close for more than 1 second or yawning for 2 seconds, it will be detected as drowsy.
Product specifications: Model Name Color/Size/Weight Camera Viewing Angle Resolution/ Frame Rate Wi-Fi Speaker (Voice Guidance) LED Indicators Wavelength of Interlor camera IR light Button Input Power 14 BLACKVUE DMC200 Black/width 115.0 mm x Height 37.88 mm STARVIS™ CMOS Sensor (Approx. 2.1 megapixels) Diagonal 115°, Horizontal 95°, Vertical 49° Full HD (1920x1080) @30fps * Frame rate may vary during Wi-Fi streaming. Built-in (802.11 b.g.
ENGLISH ENGLISH • DR900X-2CH DMS Plus Normal Mode (WiFi On/GPS On): Avg. 700mA/12V Normal Mode (WiFi Off/GPS On): Avg. 660mA/12V Parking Mode (WiFi On/GPS Off): Avg. 650mA/12V Parking Mode (WiFi Off/GPS Off): Avg. 620mA/12V Power Consumption • DR750X-2CH DMS Plus Normal Mode (WiFi On/GPS On): Avg. 650mA/12V Normal Mode (WiFi Off/GPS On): Avg. 620mA/12V Parking Mode (WiFi On/GPS Off): Avg. 600mA/12V Parking Mode (WiFi Off/GPS Off): Avg.
• DR900X-2CH DMS Plus Approx. 70°C High Temperature Cut-Off • DR750X-2CH DMS Plus Approx. 75°C • DR750X-2CH DMS LTE Plus Approx. 75°C Certifications Software Application Other Features FCC, CE, Telec, IC, UKCA, RoHS, WEEE BlackVue Viewer * Windows 7 or higher and Mac Yosemite OS X (10.10) or higher BlackVue Application (Android 5.0 or higher, iOS 9.0 or higher) Adaptive Format Free File Management System * STARVIS is a trademark of Sony Corporation.
FCC/IC Compliance Information This device complies with part 15 of the FCC Rules. Operation is subject to the following two conditions: (1) This device may not cause harmful interference, and (2) this device must accept any interference received, including interference that may cause undesired operation. This equipment has been tested and found to comply with the limits for a Class B digital device, pursuant to part 15 of the FCC Rules.
This device contains licence-exempt transmitter(s)/receiver(s) that comply with Innovation, Science and Economic Development Canada’s licenceexempt RSS(s). Operation is subject to the following two conditions: (1) This device may not cause interference. (2) This device must accept any interference, including interference that may cause undesired operation of the device.
Notes
Notes
Notes
FCC ID: YCK-DMC200 / HVIN: DMC200 / IC: 23402-DMC200 Product | DMS(Driver Monitoring System) Model Name | DMC200 Manufacturer | Plttasoft Co., Ltd. Address | A 4th floor, ABN Tower, 331, Pangyo-ro, Bundang-gu, Seongnam-si, Gyeonggi-do, South Korea, 13488 Customer Support | cs@plttasoft.com Product Warranty | One-Year Limited Warranty facebook.com/BlackVueOfficial instagram.com/BlackVueofficial www.blackvue.com Made in Korea COPYRIGHT©2022 Pittasoft Co., Ltd. All rights reserved.