
User's Manual


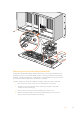
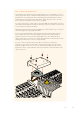
Table Of Contents
- Getting Started
- Connecting Videohub to a Network
- Smart Videohub Control Panel
- Videohub Hardware Control Panels
- Introducing Videohub Hardware Control Panels
- GPI and Tally Interface
- Connecting USB to Configure the Control Panel
- Plugging into an Ethernet Network
- Control Panel Button Diagnostics
- Updating the Software in your Videohub Controller
- About Routing Levels
- How to Select Sources and Destinations
- Using Videohub Smart Control Pro as a Cut-Bus Controller
- Using Videohub Smart Control Pro as an XY Controller
- Labeling Pushbuttons
- Universal Videohub Routers
- 3G-SDI Videohub Routers
- Videohub Router Monitoring
- Blackmagic Videohub Software
- Developer Information
- Help
- Regulatory Notices
- Safety Information
- Warranty
- English
- 日本語
- Français
- Deutsch
- Español
- 中文
- 한국어
- Русский
- Italiano
- Português
- Türkçe
- Developer Information
- はじめに
- Videohubをネットワークに接続
- Smart Videohubコントロールパネル
- Videohubハードウェアコントロールパネル
- Universal Videohubルーター
- 3G-SDI Videohub Routers
- Videohubルーターのモニタリング
- Blackmagic Videohubソフトウェア
- ヘルプ
- 規制に関する警告
- 安全情報
- 保証
- Mise en route
- Connecter le Videohub au réseau
- Panneaux de contrôle Smart Videohub
- Panneaux de contrôle matériels Videohub
- Panneaux de contrôle matériels Videohub
- GPI and Tally Interface
- Configuration du panneau de contrôle par USB
- Connexion au réseau Ethernet
- État des boutons sur le panneau de contrôle
- Mise à jour du logiciel Videohub Controller
- Niveaux de routage
- Sélectionner les sources et les destinations
- Utilisation du Videohub Smart Control Pro comme contrôleur Cut-Bus
- Utilisation du Videohub Smart Control Pro comme contrôleur XY
- Personnalisation des boutons
- Grilles de commutation Universal Videohub
- Grilles de commutation Videohub 3G-SDI
- Monitoring de la grille de commutation Videohub
- Logiciel Blackmagic Videohub
- Installation du logiciel Blackmagic Videohub
- Blackmagic Videohub Setup
- Blackmagic Videohub Control
- Configuration du Blackmagic Videohub Hardware Panel
- Configuration du Videohub Master Control Pro
- Configuration du Videohub Smart Control Pro
- Contrôle du Blackmagic MultiView 16 avec le logiciel Videohub
- Remplacer un ventilateur sur l’Universal Videohub
- Avis règlementaires
- Informations de sécurité
- Garantie
- Erste Schritte
- Anschluss einer Videohub an ein Netzwerk
- Smart Videohub Bedienpanel
- Videohub Hardware-Steuerpanels
- Neue Videohub Hardware-Steuerpanels
- GPI and Tally Interface
- Konfiguration des Steuerpanels per USB
- Anschluss an ein Ethernet-Netzwerk
- Testen der Steuertasten
- Aktualisieren der Software Ihres Videohub Controllers
- Über Steuerungsebenen
- Auswählen von Quellen und Zielen
- Verwendung des Videohub Smart Control Pro als Cut-Bus-Controller
- Verwendung des Videohub Smart Control Pro als XY-Controller
- Beschriftung der Steuertasten
- Universal Videohub Kreuzschienen
- 3G-SDI Videohub Kreuzschienen
- Monitoring mit Videohub Kreuzschienen
- Blackmagic Videohub Software
- Hilfe
- Gesetzliche Vorschriften
- Sicherheitshinweise
- Garantie
- Primeros pasos
- Conectar dispositivos Videohub a una red informática
- Smart Videohub Control Panel
- Paneles de control Videohub
- Nuevos paneles de control Videohub
- Dispositivo GPI and Tally Interface
- Conexión mediante el puerto USB para configurar el panel de control
- Conexión a una red Ethernet
- Diagnóstico de los botones en el panel de control
- Actualización del programa en el controlador Videohub
- Acerca de los niveles de distribución
- Cómo seleccionar fuentes y destinos
- Uso del panel Videohub Smart Control Pro para realizar cortes directos
- Uso del panel Videohub Smart Control Pro para realizar cambios XY
- Identificar botones
- Matrices de conmutación Universal Videohub
- Matrices Videohub SDI 3G
- Monitorización de las matrices Videohub
- Software Blackmagic Videohub
- Instalación de las aplicaciones Blackmagic Videohub
- Ejecute la aplicación Blackmagic Videohub Setup.
- Blackmagic Videohub Control
- Configuración del panel de control Videohub
- Configuración del panel Videohub Master Control Pro
- Configuración del panel Videohub Smart Control Pro
- Control del monitor Blackmagic MultiView 16 mediante Videohub Software
- Ayuda
- Normativas
- Información de seguridad
- Garantía
- 入门
- 将Videohub连接到网络
- Smart Videohub控制面板
- Videohub硬件控制面板
- Universal Videohub矩阵
- 3G-SDI Videohub矩阵
- Videohub矩阵监看
- Blackmagic Videohub软件
- 帮助
- 监管告知
- 安全信息
- 保修
- 시작하기
- Videohub를 네트워크에 연결하기
- Smart Videohub Control Panel
- Videohub 하드웨어 컨트롤 패널
- Universal Videohub 라우터
- 3G-SDI Videohub 라우터
- Videohub 라우터 모니터링하기
- Blackmagic Videohub 소프트웨어
- 도움말
- 규제 사항
- 안전 정보
- 보증
- Подготовка к работе
- Подключение коммутатора Videohub к компьютерной сети
- Панель управления на моделях Smart Videohub
- Аппаратные панели Videohub
- Обзор аппаратных панелей Videohub
- GPI and Tally Interface
- Подключение через USB для настройки панели управления
- Подключение к сети Ethernet
- Тестовая проверка кнопок на панели управления
- Обновление ПО на панели управления Videohub
- Уровневая организация маршрутизации
- Как выбирать источники и приемники сигнала
- Использование панели Videohub Smart Control Pro для управления прямым переключением
- Использование панели Videohub Smart Control Pro для управления переключением в два шага
- Добавление ярлыков на кнопки
- Коммутаторы Universal Videohub
- Коммутаторы Videohub с поддержкой 3G-SDI
- Мониторинг сигнала с коммутаторов Videohub
- ПО Blackmagic Videohub
- Помощь
- Соблюдение нормативных требований
- Правила безопасности
- Гарантия
- Operazioni preliminari
- Connettere Videohub a una rete
- Pannello di controllo di Smart Videohub
- Pannelli di controllo Videohub
- Introduzione
- GPI and Tally Interface
- Collegare il pannello di controllo al computer tramite USB
- Connessione a una rete ethernet
- Interpretare il colore dei pulsanti
- Aggiornare il software interno del pannello di controllo
- Livelli di routing
- Selezionare sorgenti e destinazioni
- Utilizzare Videohub Smart Control Pro come selettore diretto
- Utilizzare Videohub Smart Control Pro come selettore XY
- Inserire un’etichetta nei pulsanti
- Le matrici Universal Videohub
- Matrici Videohub 3G-SDI
- Monitorare i percorsi di routing
- Il software Blackmagic Videohub
- Assistenza
- Normative
- Sicurezza
- Garanzia
- Instruções Preliminares
- Conectando o Videohub a uma Rede
- Smart Videohub Control Panel
- Painéis de Controle Videohub Físicos
- Apresentando os Painéis de Controle Videohub Físicos
- GPI and Tally Interface
- Conectando USB para Ajustar Painel de Controle
- Conexão a uma Rede Ethernet
- Diagnóstico dos Botões do Painel de Controle
- Atualizando o Software no seu Controlador Videohub
- Sobre Níveis de Roteamento
- Como Selecionar Origens e Destinos
- Usando Videohub Smart Control Pro como um Controlador de Barramento de Cortes
- Usando Videohub Smart Control Pro como um Controlador XY
- Rotulando Botões
- Roteadores Universal Videohub
- Roteadores Videohub3G-SDI
- Monitoramento de Roteador Videohub
- Blackmagic Videohub Software
- Informações para Desenvolvedores
- Ajuda
- Informações Regulatórias
- Informações de Segurança
- Garantia
- Başlarken
- Videohub’un bir Ağa Bağlanması
- Smart Videohub Kontrol Paneli
- Videohub Donanım Kontrol Panelleri
- Videohub Donanım Kontrol Panelleri ile Tanışın
- GPI ve Tally Arayüzü
- Kontrol Paneli Yapılandırmak için USB’nin Bağlanması
- Bir Ethernet Ağına Bağlanma
- Kontrol Panel Buton Sistem Kontrolü
- Videohub Kontrol Cihazı Yazılımının Güncellenmesi
- Yönlendirme Seviyeleri Hakkında
- Kaynakların ve Hedeflerin Seçilmesi
- Videohub Smart Control Pro’yu Bir Cut-Bus Kontrol Cihazı olarak Kullanma
- Videohub Smart Control Pro’yu Bir XY Kontrol Cihazı olarak Kullanma
- Tuşların Etiketlenmesi
- Universal Videohub Yönlendiricileri
- 3G-SDI Videohub Yönlendiricileri
- Videohub Yönlendirici Görüntüleme
- Blackmagic Videohub Yazılımı
- Yardım
- Mevzuata İlişkin Bildirimler
- Safety Information
- Garanti
To forcibly unlock a port that has been locked by another client, send an update to the port with
the character “F” instead of using the usual unlock character “U”. For example, to override a
lock on port 7:
SERIAL PORT LOCKS:
↵
7 F
↵
↵
ACK
↵
↵
SERIAL PORT LOCKS:
↵
7 U
↵
↵
Hardware status blocks can only be sent by the Videohub Server. If a client sends hardware
status blocks, they will be ignored.
Requesting a Status Dump
The client may request that the Videohub Server resend the complete state of any status block
by sending the header of the block, followed by a blank line. In the following example, the client
requests the Videohub Server resend the output labels:
OUTPUT LABELS:
↵
↵
ACK
↵
↵
OUTPUT LABELS:
↵
0 output label 1
↵
1 output label 2
↵
2 output label 3
↵
…
↵
Checking the Connection
While the connection to the Videohub Server is established, a client may send a special
no-operation command to check that the Videohub Server is still responding:
PING:
↵
↵
If the Videohub Server is responding, it will respond with an ACK message as for any other
recognized command.
Videohub RS-422 Protocol
General
The RS-422 protocol can be used to control many Videohub models as RS-422 slave devices,
for router crosspoint switching. This feature is available on any Videohub model with an
“RS-422 Control” port.
Depending on your model of Videohub, the RS-422 port may be either a DB9 or RJ11 connector.
DB9 cables are commonly available in electrical stores. The RJ11 connector is the same used in
many landline telephone connections. By modifying an RS-422 to USB adapter cable
terminated with an RJ11 connector you can control Videohub using external controllers via USB.
81Developer Information