
User's Manual
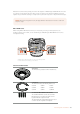

Tools Required
When attaching the EF mount, you will need a 2mm Hex driver. While it’s not absolutely
required, we recommend using a torque wrench able to accurately set a maximum torque of
0.45Nm to reduce the potential of over tightening the screws.
2mm Hex driver
Attaching the EF Mount
1
ND
FILTER
AUTO
W/B
LENS
SDI OUT
12V OUT
0
.10
2
ND
FILTER
AUTO
W/B
LENS
SDI OUT
12V OUT
0
.50
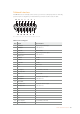
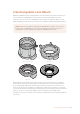
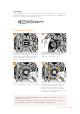
Place Blackmagic URSA Broadcast vertically ona
solid, clean bench top toensure that the mount
can be inserted vertically. If changing from the PL
to the EFmount, ensure that you have removed
thePL baffle before inserting the EF mount.
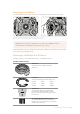
Carefully place the Blackmagic URSA Mini Pro
EFmount onto the camerabody ensuring the
reddot is at the 12o’clock position.
3
ND
FILTER
AUTO
W/B
LENS
SDI OUT
12V OUT
4
ND
FILTER
AUTO
W/B
LENS
SDI OUT
12V OUT
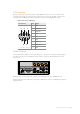
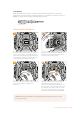
1 3
4 2
Loosely turn the four mounting screws until initial
contact is made with the shoulder of the
lens mount.
Using the 2mm Hex driver, or torque wrench
with 2mm Hex key, apply one full turn of
pressure to mounting screw 1, followed by one
full turn to screw 2, and repeat for screw 3 and
then 4. Continue to apply one full turn to each
screw in the sequence above until all screws
have reached the maximum torque of 0.45Nm.
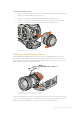
NOTE When removing the EF mount, simply follow the instructions in reverse order
from step 4 to step 1.
167Interchangeable Lens Mount