
User's Manual

Assigning an IP Address
Once you’ve assigned an input to a HyperDeck, you’ll need to enter its IP address. This allows
ATEM 1 M/E Advanced Panel to control the HyperDeck via Ethernet.
To enter a HyperDeck’s IP address, navigate to the third HyperDeck settings page with the ‘left’
or ‘right’ arrow buttons, or pressing ‘3’ on the numeric keypad while in the HyperDeck
settings menu.
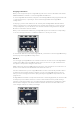
In this page, you’ll see an IP address for the currently selected HyperDeck. Each IP address
number corresponds to a rotary knob below it. To change these numbers, you can rotate the
corresponding knob, or press the knob once and enter a number using the numeric keypad.
Do this for each number in the IP address.
Once you’ve entered the IP address for your HyperDeck, press the soft button corresponding
to the ‘save changes’ indicator to confirm the address. To cancel, press ‘undo’.
HOME
MIX
FTB
MACRO
SETTINGS
WIPE
MEDIA
PLAYERS
SUPER
SOURCE
KEYS
DVE
BORDER
CAMERA
CONTROL
STINGER
COLOR
AUDIO
DIP
AUX
1
4
7
ENTER
2
5
8
0
3
6
9
RESET
PROGRAM
PREVIEW
SHIFT MACRO
BKGD
KEY 1
KEY 2
KEY 4
KEY 3
ON
ON
ON
ON M/E 1 M/E 2
M/E 3
M/E 4
SHIFT DIP
DVE
STING
DSK 1
TIE
DSK 2
TIE
DSK 1
CUT
DSK 2
CUT
DSK 1
AUTO
DSK 2
AUTO
FTB
MIX
CUT
AUTO
WIPE
ARM
PREV
TRANS
UNDO
SAVE
CHANGES
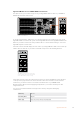
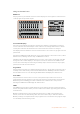
HYPERDECK SETTINGS
HyperDeck 1 IP Address
. . .
192 168 25 69. . .
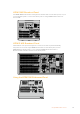
To enter the IP address for subsequent HyperDecks, you’ll need to select the HyperDeck using
the first page of the HyperDeck settings menu.
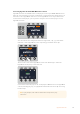
Auto Roll
You can toggle your HyperDeck’s auto roll function from the second screen of the HyperDeck
settings menu. While in the HyperDeck settings menu, use the ‘left’ or ‘right’ arrow buttons in
the system control panel to navigate to this screen.
While in this menu, press the LCD soft button above the ‘auto roll’ indicator to turn the auto roll
feature on. The indicator text will illuminate blue when auto roll is on.
The auto roll feature lets you set a HyperDeck disk recorder to automatically roll video when it
is switched to the program output. For example, you can cue a HyperDeck to the point you
want your source to begin, then roll the clip by pressing the HyperDeck’s input button on the
program row.
As HyperDecks must buffer a couple of frames before commencing playback, the actual cut will
be delayed a preset number of frames to ensure a clean transition. This is just like setting a
preroll on a videotape machine. You can adjust the length of this delay by changing the ‘offset’
frames number using the control knob under this indicator. Press the soft button above the
‘save changes’ indicator to confirm your change.
HOME
MIX
FTB
MACRO
SETTINGS
WIPE
MEDIA
PLAYERS
SUPER
SOURCE
KEYS
DVE
BORDER
CAMERA
CONTROL
STINGER
COLOR
AUDIO
DIP
AUX
1
4
7
ENTER
2
5
8
0
3
6
9
RESET
PROGRAM
PREVIEW
SHIFT MACRO
BKGD
KEY 1
KEY 2
KEY 4
KEY 3
ON
ON
ON
ON M/E 1 M/E 2
M/E 3
M/E 4
SHIFT DIP
DVE
STING
DSK 1
TIE
DSK 2
TIE
DSK 1
CUT
DSK 2
CUT
DSK 1
AUTO
DSK 2
AUTO
FTB
MIX
CUT
AUTO
WIPE
ARM
PREV
TRANS
AUTO ROLL UNDO
SAVE
CHANGES
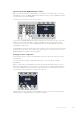
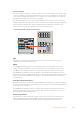
HYPERDECK SETTINGS
HyperDeck 1
. . .
6
OFFSET FRAMES
95HyperDeck Control