
User's Manual

HyperDeck Setup with ATEM 1 M/E Advanced Panel
Once you have connected your HyperDeck to your switcher, as detailed in the ‘connecting
HyperDecks’ section, use ATEM 1 M/E Advanced Panel’s system control and LCD soft buttons
to setup and control your HyperDecks.
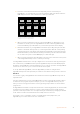
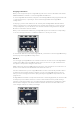
To begin, press the system control ‘settings’ button.
HOME
MIX
FTB
MACRO
SETTINGS
WIPE
MEDIA
PLAYERS
SUPER
SOURCE
KEYS
DVE
BORDER
CAMERA
CONTROL
STINGER
COLOR
AUDIO
DIP
AUX
1
4
7
ENTER
2
5
8
0
3
6
9
RESET
PROGRAM
PREVIEW
SHIFT MACRO
BKGD
KEY 1
KEY 2
KEY 4
KEY 3
ON
ON
ON
ON M/E 1 M/E 2
M/E 3
M/E 4
SHIFT DIP
DVE
STING
DSK 1
TIE
DSK 2
TIE
DSK 1
CUT
DSK 2
CUT
DSK 1
AUTO
DSK 2
AUTO
FTB
MIX
CUT
AUTO
WIPE
ARM
PREV
TRANS
SWITCHER HYPERDECKS
BUTTON
MAPPING
SETTINGS
Switcher
. . . . .
PANEL
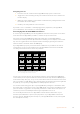
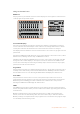
You’ll notice that ATEM 1 M/E Advanced Panel displays four setup options along to top of the
LCD screen. These include ‘switcher,’ ‘panel,’ ‘HyperDecks,’ and ‘button mapping.’ Each
corresponds to a setup menu. Press the LCD soft button above ‘HyperDecks’ to enter the
‘HyperDeck settings’ menu.
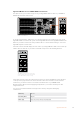
The HyperDeck settings menu has three pages, which you can select using the ‘left’ and ‘right’
arrow buttons in the system control panel, or by pressing the ‘1,’ ‘2,’ and ‘3’ buttons on your
ATEM 1 M/E Advanced Panel’s numerical keypad.
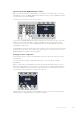
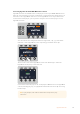
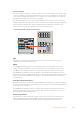
Assigning an input to a HyperDeck
In the first menu page, you’ll see the ‘HyperDeck’ indicator in the bottom left corner and an
‘input’ indicator.
Use the control knob under the ‘HyperDeck’ indicator to cycle through the available
HyperDecks.
Once you have selected a HyperDeck, rotate the knob under the ‘input’ indicator to select
which input that HyperDeck is connected to on your switcher. For example, if HyperDeck 1 is
connected to SDI In 4 on your switcher, rotate the knob under the ‘input’ indicator to select
‘camera 4.’ Press the ‘input’ knob to confirm your selection.
HOME
MIX
FTB
MACRO
SETTINGS
WIPE
MEDIA
PLAYERS
SUPER
SOURCE
KEYS
DVE
BORDER
CAMERA
CONTROL
STINGER
COLOR
AUDIO
DIP
AUX
1
4
7
ENTER
2
5
8
0
3
6
9
RESET
PROGRAM
PREVIEW
SHIFT MACRO
BKGD
KEY 1
KEY 2
KEY 4
KEY 3
ON
ON
ON
ON M/E 1 M/E 2
M/E 3
M/E 4
SHIFT DIP
DVE
STING
DSK 1
TIE
DSK 2
TIE
DSK 1
CUT
DSK 2
CUT
DSK 1
AUTO
DSK 2
AUTO
FTB
MIX
CUT
AUTO
WIPE
ARM
PREV
TRANS
SWITCHER HYPERDECKS
BUTTON
MAPPING
HYPERDECK SETTINGS
HyperDeck 1
. . .
PANEL
1 Camera 1
HYPERDECK INPUT
Repeat this process for any additional HyperDecks you have connected to your switcher by
assigning inputs to HyperDeck slots 1, 2, 3 and 4, if required.
94HyperDeck Control