
User's Manual
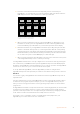
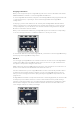

4 Press the source button that matches the input that you have connected your
HyperDeck to or scroll through your source list using the third control knob under the
LED display. Press the ‘save’ soft button to confirm yourselection.
HYPER
DECK
1
HYPER
DECK
2
HYPER
DECK
3
HYPER
DECK
4
INFO INPUT
AUTO
ROLL
HYPER
DECK
IP
BACK
SAVE REVERT
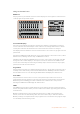
Use the HyperDeck setup menu to
configure connected HyperDecks
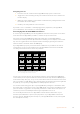
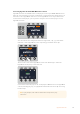
5 Once you have specified the source for a given HyperDeck, you will need to set its
IPaddress. To do this, press the ‘HyperDeck IP’ soft button in the HyperDeck setup
menu. This will bring up an IP address on your broadcast panel’s four line display.
6 Match this IP address to your HyperDeck’s IP address by scrolling through each value
with the control knob directly under it, or selecting that value with the corresponding
soft button under its control knob and entering the details with your broadcast panel’s
Number Pad. Once you have finished entering each value, press the soft button under
its ‘set’ title in the system control LED display to confirm that digit.
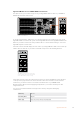
7 Once you have entered the entire IP address, press the ‘save’ soft button in the system
control ‘HyperDeck Setup’ menu to confirm your settings.
Your HyperDeck should now be correctly configured. You can check its status by pressing the
‘Info’ soft button in your ATEM broadcast panel’s HyperDeck setup menu. This will display the
IPaddress, the HyperDeck’s status and whether it is set to ‘remote’ operation. Your HyperDeck
must be set to ‘remote’ for you to control it via the broadcast panel.
To set up additional HyperDecks, select the HyperDeck you want to configure in the
HyperDeck setup menu and repeat this procedure for each disk recorder you have connected.
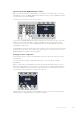
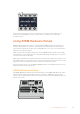
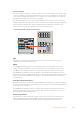
Auto Roll
You can also toggle your HyperDeck’s auto roll function from the ‘HyperDeck Setup’ menu in
System Control.
The auto roll feature lets you set a HyperDeck disk recorder to automatically roll video when it
is switched to the program output. For example, you can cue a HyperDeck to the point you
want your source to begin, then roll the source by pressing its input button on the mix effects
program row.
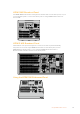
As HyperDecks must buffer a couple of frames before commencing playback, the actual cut will
be delayed a preset number of frames to ensure a clean transition. This is just like setting a
preroll on a videotape machine. You can adjust the length of this delay by changing the number
in the ‘offset’ box. We’ve found that five frames usually ensures a clean cut.
If you want to cue to a still frame of video or manually trigger video playback on your
HyperDeck, you can also deselect the ‘auto roll’ feature.
91HyperDeck Control