
User's Manual
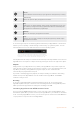

OUT
IN
DC IN REMOTE
ANALOG INPUT
OUT
OUT
SDI OUT
A B C D
A B C D
IN
AC IN
REF
TIME CODE
OUT
OUT
IN
STEREO IN NTSC / PAL Y
B/Y R-Y
L
R
CHANNELS 1 & 2 CHANNELS 3 & 4
ANALOG OUT1
1 ANALOG IN ANALOG IN
2
2
3
3
4
4
ANALOG OUT
MONITOR DIGITAL VIDEO
EXT DISK
ETHERNET
USB
SDI IN
IN
MADI OUT
TALKBACK
REF IN SDI INPUTS SDI OUTPUTS MULTIVIEW ANALOG AUDIOUSB
1 2 1
1 2 3 4 5 6 7 8 9 10 1 2 3 4 5 6
5 9 13 17 21 25 29 33 37 1 5 9 13 17 21 1
2
3
4
CH 1
CH 2
CH 1
CH 2
OUT
2 6 10 14 18 22 26 30 34 38 2 6 10 14 18 22
3 7 11 15 19 23 27 31 35 39 3 7 11 15 19 23
4 8 12 16 20 24 28 32 36 40 4 8 12 16 20 24
IN
8K INPUTS 8K OUTPUTS
REMOTE
MADI IN
CONTROL
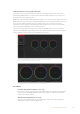
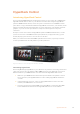
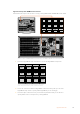
Plugging the 8K quad link SDI output of a Hyperdeck Extreme 8K HDR
into the SDI input of an ATEM Constellation 8K.
4 Plug the SDI or HDMI output of your HyperDeck into the SDI inputs of your
ATEM switcher, or the HDMI inputs if available. If you are using quad link SDI,
it’s important to connect each input and output in the correct order.
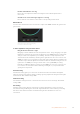
5 If you want to record your ATEM switcher’s program output with your HyperDeck,
plugone of the switcher’s SDI auxiliary outputs into the SDI input of your HyperDeck.
With ATEM Constellation 8K, you can connect any SDI output to the SDI input of your
HyperDeck.
6 Repeat the process for each HyperDeck you want to connect.
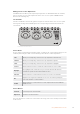
Now all you have to do is tell your ATEM software or ATEM broadcast panel which input and
IPaddress each HyperDeck is using. You can do this in the HyperDeck tab in ATEMSoftware
Control switcher settings, or using the system control soft buttons on an ATEMbroadcast panel.
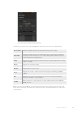
HyperDeck Settings
HyperDeck connection settings are located in the ‘HyperDeck’ tab of the ATEM Software
Control switcher settings. Here you’ll see setup options for up to four HyperDecks.
Entering the necessary details is as easy as typing in your HyperDeck’s IP address in the
‘IPAddress’ box and choosing the source it’s plugged into from the ‘input’ dropdown menu.
Click ‘connect’ and your HyperDeck is ready to be controlled.
Status indicators appear above and below each HyperDeck icon to let you know the
connection status. A green tick means your HyperDeck is connected, in remote and
ready to go.
If your HyperDeck is connected and recognized, but does not have its remote button enabled,
you will see an indicator letting you know remote is not active.
If your HyperDeck is not recognized, you will see a ‘failed to connect’ indicator. If you see this
indicator, check the HyperDeck’s Ethernet port is connected to your network and the
IPaddress is entered correctly.
86HyperDeck Control