
User's Manual

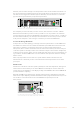


To perform a transition:
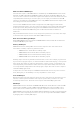
1 Select the next source by pressing button 4. The button will now illuminate green to
show it’s selected on the preview bus.
2 Press the cut or auto buttons.
If you press cut, button 4 will now illuminate red as it’s on air. Input 4 will also be switched to the
program output. If you select auto, then the currently selected transition will be triggered. While
the transition is occurring, you will see both buttons illuminated red because both sources are
on air during the transition.
PROD
TALK
ENG
TALK
CALL
PGM
MIX
5
4
3
2
1
1 2 3 4 5 6 7 8 9 10
KEY 1
MIX
DSK 1
MIX
DSK 2
MIX
FTB
BARS BLACK MP1 MP2
MIX WIPE DIP DVE
LOCK
MENU
SET
11 12 13 14 15 16 17 18 19 20
21 22 23 24 25 26 27 28 29 30
31 32 33 34 35 36 37 38 39 40 CUT AUTO
1 4
+2.3dB
Camera 4
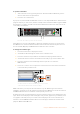
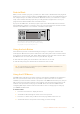
Press the ‘auto’ button to perform an auto transition.
That’s all there is to it! If you would like to change the transition type, then you can do this in
theLCD menus or the four dedicated transition selection buttons on the front panel. You can
choose from Mix, Dip, Wipe and DVE transitions with the touch of a button.
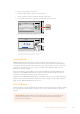
To change the transition type:
1 Press the menu button to display the menus.
2 Scroll with the knob through the menus to the ‘transition’ menu.
3 Press the set button and you will see the transition menu page will be selected.
4 Scroll down the list of items in the transition menu until you get to the transition item.
5 Press the set button and scroll through the list of options. Let’s select the
DVEtransition.
6 Press ‘set’ to select it. You can press the ‘menu’ button to back out of the menus back
to the main video preview screen.
PROD
TALK
ENG
TALK
CALL
PGM
MIX
5
4
3
2
1
1 2 3 4 5 6 7 8 9 10
KEY 1
MIX
DSK 1
MIX
DSK 2
MIX
FTB
BARS BLACK MP1 MP2
MIX WIPE DIP DVE
LOCK
MENU
SET
11 12 13 14 15 16 17 18 19 20
21 22 23 24 25 26 27 28 29 30
31 32 33 34 35 36 37 38 39 40 CUT AUTO
Transition
Dip
Wipe
Mix
DVE
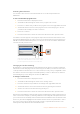
Use the LCD menu to select the transition type and you can also
set the transition duration in the transition settings.
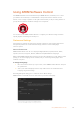
While in the menu, you can press the ‘auto’ button to try the different types of transitions
available to you. Each one of the transition types listed in the LCD menus can also be selected
in ATEM Software Control or a hardware control panel if you have one.
As well as the group of main input buttons, the front panel has other sources labeled ‘mp1’ and
‘mp2’. These are media player 1 and media player 2. If you have graphics in your switcher, such
as a graphic or title slide, then you can select the media players as sources and then cut or
transition to them. ATEM Constellation 8K has one media player in 8K mode and four media
players in HD and Ultra HD mode.
34Using the ATEM Constellation 8K FrontPanel