
User's Manual


This does not change the IP address of the switcher itself. It just changes where the control
panel is looking to find the switcher. If the control panel cannot find the switcher, then you might
need to check the switcher to see if it’s been set correctly. To change the IP address of the
switcher, connect the switcher via USB to a computer and run Blackmagic ATEM Setup as
described previously in this manual.
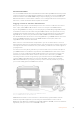
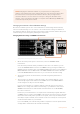
Home Menu
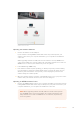
ATEM 1 M/E Production Switcher
Control Panel Connected OK
Panel IP Address: 192.168.10.10
Connecting to 192.168.10.240...
Control Panel Not Connected
Changing the IP location on ATEM 1 M/E Advanced Panel
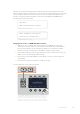
1 When there is no communication with the switcher, the LCD will say ‘connecting’
and notify you of the IP address it is searching for. If the panel can’t find the switcher,
the connection will time out and a notification will ask you to check the IP address.
Press the ‘network’ soft button above the LCD to open the network settings.
2 In the network settings, press the right arrow in the system control buttons next to the
LCD to move to the ‘switcher IP address’ setting.
3 Now use the corresponding LCD soft control knobs to set the correct IP address for
your switcher.
4 Press the ‘save changes’ soft button to confirm the setting.
Your panel will now connect with your switcher.
STINGER
COLOR
AUDIO
DIP
AUX
1
4
7
ENTER
2
5
8
0
3
6
9
RESET
UNDO
SAVE
CHANGES
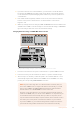
HYPERDECK SETTINGS
Switchers IP Address
. . . .
192 168 24 247. . .
BACK DHCP OFF
STINGER
COLOR
AUDIO
DIP
AUX
1
4
7
ENTER
2
5
8
0
3
6
9
RESET
UNDO
SAVE
CHANGES
HYPERDECK SETTINGS
Switchers IP Address
. . . .
192 168 24 247. . .
BACK DHCP OFF
On the ATEM 1 M/E Advanced Panel, press the ‘network’ LCD
soft button to open the network settings on the LCD, then use
the system control arrow buttons to navigate to the switcher
IP address setting. Use the soft controls to set the network IP
address for your switcher, and don’t forget to save the changes.
25Getting Started