
User's Manual


You can also disable the banks by holding down the bank soft button until the ‘bank off’ setting
appears on the LCD.
Turning the banks off lets you change the CCUs to other cameras when needed, with a defined
set of cameras ready on each bank you can access at any time. To enable banks, simply press
the bank button again.
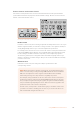
SETTINGS BANK A RECALL ALL
CAMERA CONTROL
Camera 1
1
CAMERA
CAMERA CONTROL
Camera 2
2
CAMERA
CAMERA CONTROL
Camera 3
3
CAMERA
CAMERA CONTROL
Camera 4
4
CAMERA
SETTINGS BANK B RECALL ALL
CAMERA CONTROL
Camera 5
5
CAMERA
CAMERA CONTROL
Camera 6
6
CAMERA
CAMERA CONTROL
Camera 7
7
CAMERA
CAMERA CONTROL
Camera 8
8
CAMERA
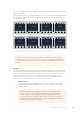
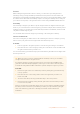
The bank setting lets you assign 2 banks of cameras to the four CCUs and then
instantly swap between them by pressing the ‘bank’ soft button
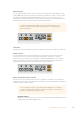
TIP Any camera can be selected on each CCU in both banks. For example, imagine
you want to have constant control over camera 1, even after switching to another bank
of cameras. All you need to do is make sure one CCU in each bank always has camera
1 selected.
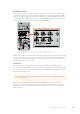
Settings
Pressing the ‘settings’ button on the home screen opens all settings for your camera control
panel. Navigate through the pages of settings by pressing the arrow soft button. The network
settings, including DHCP and IP address settings, are the first pages in the sequence. These
settings are described in the section that shows how to change network settings when
connecting the camera control panel to your ATEM switcher. Keep reading this section for
information on the additional settings for your camera control panel.
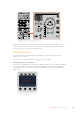
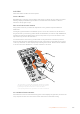
Auxiliary Select
Select the auxiliary output you want to assign to camera control. Turn the auxiliary
control knob underneath the LCD clockwise or counter clockwise to choose an
auxiliary output.
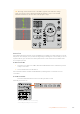
NOTE The auxiliary selection differs depending on which ATEM switcher
youare connected to. For example, a switcher with 1 auxiliary output will
provide auxiliary 1 or none. A switcher with more auxiliary outputs lets you
choose which output to assign to camera control, or select none if you want
the auxiliary outputs to be dedicated to other sources. ATEM Constellation 8K
lets you choose from any of its outputs.
201Using ATEM Camera Control Panel