
User's Manual

9 To set the macro to wait for 2 seconds before applying the next transition, press and
hold the add pause soft button in the macros block. Notice the time durations shown
in the source names display. Select 2:00, 2:00 again and 1:00 from the macro buttons
above the durations. The durations are accumulative so you can build various pause
times. *Inserted Pause* will momentarily display on the active system control LED
display to confirm your pause.
10 Now select blk on the preview bus and press the auto button. Your ATEM switcher will
perform a mix transition to black.
11 Press the record soft button in the macros block to stop recording your macro.
You’ve just recorded a macro using an ATEM 2 M/E Broadcast Panel. The macro will appear as
a macro button named ‘2’ because it is located in macro slot 2. The number of characters are
limited on control panels, but you can easily name your macro and add notes by clicking on the
‘edit macro’ button in ATEM Software Control. For this reason, it’s probably better to record
macros using ATEM Software Control, however you can record a macro from any control
panel you like.
To run your macro, press the play soft button in the macros block. If your macro was successful,
you should see your ATEM switcher mix from color bars to color 1 using a 3 second mix
transition, pause for 2 seconds, then perform another 3 second mix transition to black, all by
pressing one button on your ATEM 2 M/E Broadcast Panel.
To edit the name of the macro you just recorded, click on the edit macro button on the create
page of the macros window in ATEM Software Control. You can also add notes to describe
the macro.
It’s worth frequently testing your macros using different switcher settings to make sure the
macro performs all the specific functions you intended, doesn’t miss any instructions or
produce something unexpected.
If you want to record over a previously recorded macro, or if you made a mistake and want to
start recording a macro again, shift select the record button. This is a safety measure to prevent
accidentally recording over a macro.
For information on the macro delete, show names, stop and loop buttons, refer to the System
Control Macros Menu section.
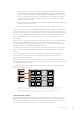
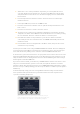
CUT
SHIFT
ON
KEY 1
PLAY RECORD
SHOW
NAMES
RECALL
DELETE
HOME
STOP
BKGD
CUT AUTO
KEY 2 KEY 3 KEY 4
ON ON ON
1 2 3
4 5 6
7 8 9
CAM 0 CLR
PREV
TRANS
FILL
DIP
MIX
DSK 1
TIE
DSK 2
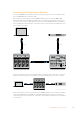
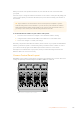
Control Panel
Switcher
Main
Backup
Main
Backup
TIE
DSK 1
CUT
DSK 2
CUT
DSK 1
AUTO
DSK 2
AUTO
FTB
LOOP
DVE
WIPE
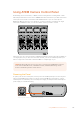
CUT
SHIFT
ON
KEY 1
PLAY RECORD
SHOW
NAMES
RECALL
DELETE
HOME
STOP
BKGD
CUT AUTO
KEY 2 KEY 3 KEY 4
ON ON ON
1 2 3
4 5 6
7 8 9
CAM 0 CLR
PREV
TRANS
FILL
DIP
MIX
DSK 1
TIE
DSK 2
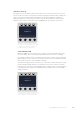
Control Panel
Switcher
Main
Backup
Main
Backup
TIE
DSK 1
CUT
DSK 2
CUT
DSK 1
AUTO
DSK 2
AUTO
FTB
LOOP
DVE
WIPE
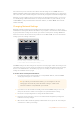
CUT
SHIFT
ON
KEY 1
PLAY RECORD
SHOW
NAMES
RECALL
DELETE
HOME
STOP
BKGD
CUT AUTO
KEY 2 KEY 3 KEY 4
ON ON ON
1 2 3
4 5 6
7 8 9
CAM 0 CLR
PREV
TRANS
FILL
DIP
MIX
DSK 1
TIE
DSK 2
Control Panel
Switcher
Main
Backup
Main
Backup
TIE
DSK 1
CUT
DSK 2
CUT
DSK 1
AUTO
DSK 2
AUTO
FTB
LOOP
DVE
WIPE
To load a macro so it’s cued and ready to run, make sure the recall buttonis selected. Select
the macro you want to run by pressing the desired macro button, or using the numeric
keypad. Now you can run your macro at any time by pressing the play button. Whenrecall
and run is selected, your macro will automatically run as soon as you select it.
System Control Macros Menu
The system control menu soft buttons perform exactly the same macro functions for both
ATEM1 M/E and 2 M/E Broadcast panels. These buttons let you record, run and delete macros,
plus select macro playback features such as recall/recall and run and loop. Press the ‘macro’
button on the system control ‘home’ menu to access the macro soft buttons.
192Using Macros