
User's Manual

Camera
1
Camera
2
Camera
3
Camera
4
Camera
5
Camera
6
Camera
7
Camera
8
Media
Player
1
Media
Player
2
Color
Bars
Media
Player
1 Key
Media
Player
2 Key
Color
1
Color
2
Black
1
8 9
0 CLRCAM
2 3
4 5 6
7
ON ON ON ON
ON ON ON ON
SHIFT
SHIFT
SHIFT
SHIFT
KEY 1
CUT
KEY 2
CUT
STNG
CUT
DVE
CUT
AUX 1
AUX 7
AUX 2
AUX 8
AUX 3
AUX 9
AUX 4
AUX 10
AUX 5
AUX 11
AUX 6
AUX 12
BORD
DIP
KEY 3
CUT
KEY 4
CUT
SHIFT
DEST
KEY 1
CUT
BORD
DIP
STNG
CUT
DVE
CUT
DSK 2
CUT
SSRC
CUT
BOX 1
DSK 1
CUT
KEY 2
CUT
KEY 3
CUT
KEY 4
CUT
BOX 3BOX 2 BOX 4
SHIFT
DEST
TIE
DSK 1
TIE
DSK 2
CUT
DSK 1
CUT
DSK 2
AUTO
DSK 1
AUTO
DSK 2
WIPE STNG DVE
MIX
DIP
BKGD KEY 1 KEY 2 KEY 3 KEY 4
WIPE STNG DVE
MIX
DIP
BKGD KEY 1 KEY 2 KEY 3 KEY 4
BOX 2
BOX 4
PATT
M/E 2
KEY
M/E 2
BOX 2
BOX 4
PATT
M/E 1
KEY
M/E 1
AUTOCUT
FTB
FTB
PREV
TRANS
AUTOCUT
PREV
TRANS
TRANS
DSK
KEYS
EFFECTS
KEYS
MEDIA
PLAYER
PANEL
SETUP
COLOR
MACRO
1
RECALL
& RUN
Camera
1
Camera
2
Camera
3
Camera
4
Camera
5
Camera
6
Media
Player
1
Media
Player
2
Color
Bars
Media
Player
1 Key
Media
Player
2 Key
Color
1
Color
2
Black
PLAY
RECORDLOOP
PLAY
RECORD
SHOW
NAMES
RECALL
DELETE
HOME
STOP
LOOP
MACRO
1
RECALL
PLAY
RECORDLOOP
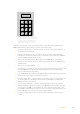
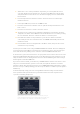
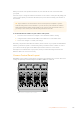
Use the keypad under the joystick control
to select up to 100 macros to record and
run. Simply type in the desired macro
number and press ‘cam’ to select your
macro to run, or macro slot to record.
Follow the steps below to create the same ‘Transitions’ macro demonstrated earlier using
ATEMSoftware Control, except this time you’ll record to macro slot 2.
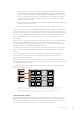
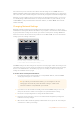
1 Press macro slot button 2 in the source select bus located above the program bus, or
by using the numeric keypad.
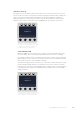
2 Press the record button in the macros block. The record button will begin flashing
indicating you are now recording a macro. You can also see the red border displayed
around the ATEM Software Control panel.
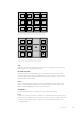
3 Select bars on the Program bus. Depending on the ATEM switcher you’re using,
youmay need to shift select bars on your broadcast panel. The button will flash if it’s
ashifted source.
4 Select col1 on the preview bus.
If you wish, you can easily map buttons such as bars, black and color generators to any
of the first 20 buttons of the program and preview bus. See the ‘button mapping’
section of this manual for instructions.
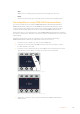
5 Press the DVE/wipe button in the active M/E transition control and then press dip/mix to
ensure the macro records the mix transition selection.
6 Press the orange ‘home’ soft button in the system control macros menu. Now you can
access the transition settings. Don’t worry, the macro will still be recording while a
different menu layout is selected.
7 Press the trans soft button to enter the transition settings. You’ll see the transition
settings displayed on the active system control LED display. Turn the knob under the
mix setting to set a 3:00 second transition rate. Press the home button again to exit
the transition settings and press macro to return to the macro soft buttons. The record
button is flashing so you can see your macro is still recording.
8 Press the auto button in transition control to perform the transition from color bars
to color 1.
191Using Macros