
User's Manual

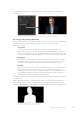
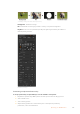


You can preview your key at any time by clicking the ‘preview’ button above the chroma
sample panel.
Use the preview button to check what your key will look like in the M/E 1 PVW output
Fine Tuning your Key using Key Adjustments
Once you have achieved a good chroma sample that removes most of your green screen while
generally retaining foreground elements, its time fine tune your key with the ‘key
adjustments’ controls.
Foreground
Use the ‘foreground’ slider to adjust how opaque the foreground mask is. This
determines the strength of the foreground against the background. By increasing the
slider, you can fill in any small areas of transparency inside your foreground image. We
recommend moving this slider and stopping as soon as the foreground becomes solid.
Background
The ‘background’ slider adjusts the opacity of the keyed area. Use this slider to fill in
any small foreground artifacts left over in the area of the image you want to remove.
We recommend moving the slider until your keyed area is consistently opaque.
Key Edge
The “key edge” slider moves the edge of your keyed area in or out, helping to remove
background elements from the very edge of your foreground or extending the
foreground out a little if your key is too aggressive. This can be especially useful with
fine details like hair. We recommend moving this slider until the edge of your key is
generally clean, without any background artifacts visible.
Using the key adjustment controls, your foreground elements should be cleanly separated from
the background.
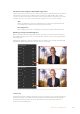
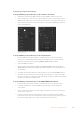
While making key adjustments, it can be useful to assign one of your multi view windows to
show your key mask. For example, if your performing a chroma key on M/E 1, set one of the
outputs to “ME 1 KEY MASK 1.” This will give you a clearer view of your key for fine adjustments.
Displaying your key mask in a seperate MultiView
window can make fine tuning a key much easier.
164Operating your ATEM Switcher