
User's Manual
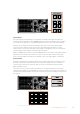
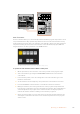

When connecting more than one remote head, they will normally be daisy chained together via
the RS-422 outputs/inputs between each head.
PUSH PUSH
CONTROL
USB 2.0 HDMI IN
SDI INPUTS REF IN AUX 1-3 PREVIEW PROGRAM OUTPUTS MULTI-VIEW ANALOG AUDIO IN
STEREO IN
REMOTE
ANALOG AUDIO OUT
CH 1
All SDI and HDMI video connections are
SD, HD and Ultra HD switchable unless indicated
CH 2CH 1 CH 2
IN
1
IN
2
IN
1
IN
3
IN
4
IN
5
IN
6
IN
7
IN
8
IN
9
IN
10
2
1 3
2
1
HD HD HD
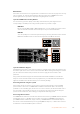
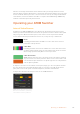
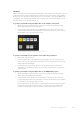
Connect a remote camera head to your ATEM 1 M/E or 2 M/E model
switcher via the RS-422 port labeled ‘remote’ on the rear panel.
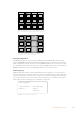
PTZ Setup for Remote Heads
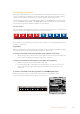
All PTZ setup options are accessed via your ATEM Broadcast Panel’s system control soft
buttons. These soft buttons allow you to enter the PTZ soft menu so you can select cameras
and enable the joystick for PTZ control, detect connected devices, plus select the ‘baud’ rate
so you can control heads made by different manufacturers.
Once your remote heads are connected to your ATEM switcher, setting them up is easy.
To detect the connected devices:
1 Press the ‘PTZ’ soft button in the system control ‘home’ menu to access the PTZ
setup options.
2 Press the ‘Setup’ soft button.
3 Press the ‘detect’ soft button.
A message will appear in the system control LED display describing the number of connected
devices, which will also appear as camera numbers labeled on the system control soft buttons.
Simply press the buttons to select each camera head. Camera numbering is based
onconsecutive order from the first remote head connected, through to the last in the chain.
Forexample, the first camera connected to your ATEM switcher will be labeled ‘Cam 1’, the
second camera daisy chained to the first will be ‘Cam 2’, the third in the chain as ‘Cam 3’, etc.
If the number of connected devices that appear on the LED and soft buttons don’t match the
physical number you have connected, check that all your camera heads are powered and their
RS-422 ports are plugged correctly. Once all your camera heads are visible on your ATEM
Broadcast Panel, select each camera with the system control soft buttons and make some
quick adjustments with the joystick to check they are all working properly.
Joystick PTZ Controls
Joystick PTZ controls are very intuitive. Simply turn the joystick knob clockwise or counter
clockwise to zoom in and out. Push up and down to tilt the camera. Push left and right to pan.
The controls are sensitive to the degree of movement of the joystick, letting you ease in and
out of your camera moves. The amount of sensitivity may vary between remote heads.
If you want to wire a custom built PTZ unit using a standard RS-422 port DB-9 connector or
RJ12 connector, see the ‘Serial Port Pin Connections for Control Cables’ section.
133Using ATEM Hardware Panels