
User's Manual
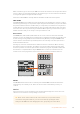
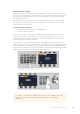

TIP It’s recommended to use the transition control block to perform transitions
because it provides the opportunity to verify the video content on the preview
output before sending it to the program output, for example to verify that a
camera is in focus.
CUT
SHIFT
ON
KEY 1
CAM
1
CAM
2
CAM
3
SETUP
HOME
BKGD
CUT AUTO
KEY 2 KEY 3 KEY 4
ON ON ON
1 2 3
4 5 6
7 8 9
CAM 0 CLR
PREV
TRANS
FILL
DIP
MIX
DSK 1
TIE
DSK 2
Control Panel
Switcher
Main
Backup
Main
Backup
TIE
DSK 1
CUT
DSK 2
CUT
DSK 1
AUTO
DSK 2
AUTO
FTB
CUT
SHIFT
ON
KEY 1
CAM
1
CAM
2
CAM
3
SETUP
HOME
BKGD
CUT AUTO
KEY 2 KEY 3 KEY 4
ON ON ON
1 2 3
4 5 6
7 8 9
CAM 0 CLR
PREV
TRANS
FILL
DIP
MIX
DSK 1
TIE
DSK 2
Control Panel
Switcher
Main
Backup
Main
Backup
TIE
DSK 1
CUT
DSK 2
CUT
DSK 1
AUTO
DSK 2
AUTO
FTB
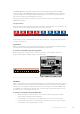
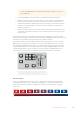
Press the button marked CUT in the transition control block to perform a cut transition
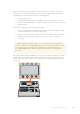
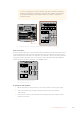
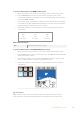
Auto Transitions
An auto transition allows you to automatically transition between program and preview sources
at a predetermined rate. Any upstream keys that were selected in the next transition and any
downstream keys that were tied to the transition control will also change state. Auto transitions
are performed using the auto button in the transition control block. Mix, dip, wipe, DVE and
stinger transitions can all be performed as an AUTO transition.
CUT
SHIFT
ON
KEY 1
CAM
1
CAM
2
CAM
3
SETUP
HOME
BKGD
CUT AUTO
KEY 2 KEY 3 KEY 4
ON ON ON
1 2 3
4 5 6
7 8 9
CAM 0 CLR
PREV
TRANS
FILL
DIP
MIX
DSK 1
TIE
DSK 2
Control Panel
Switcher
Main
Backup
Main
Backup
TIE
DSK 1
CUT
DSK 2
CUT
DSK 1
AUTO
DSK 2
AUTO
FTB
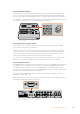
The auto transition button is part of
the transition control block
To perform an auto transition
1 On the preview bus, select the video source that you want on the program output.
2 Select the transition type using the transition type buttons in the transition
control block.
3 In the system control, set the transition rate and adjust any other parameter for the
transition as needed.
108Using ATEM Hardware Panels