
User's Manual
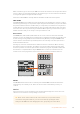

If there are small dot icons on the LCD menu, this means there is more than one page of
settings and you can move through the pages by pressing the left and right arrow buttons.
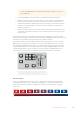
For example, to change the border softness on a wipe transition
1 Press the ‘wipe’ button.
2 Press the right arrow button next to the LCD to move to the third page of settings.
3 Rotate the control knob under the ‘softness’ setting to change the softness of the wipe
transition border.
If you want to change the direction of the wipe transition
1 Press the arrow buttons to navigate back to the first page of wipe transition settings,
orpress the ‘wipe’ button to return to the first page.
2 Press the ‘reverse direction’ soft button at the top of the LCD to change the direction.
3 Once you are satisfied with the setting, press the ‘home’ button to return to the
home page.
TIP When changing the border softness, you can visually monitor your adjustments in
real time. Simply press the PREV TRANS button and move the fader bar while watching
the preview output on the multi view to visually monitor your settings. Remember to
press PREV TRANS again to disable the transition preview when you’re happy with
thesettings.
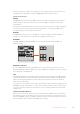
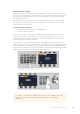
The system control buttons and LCD menu are used to access all the settings for your panel
and you can even set general switcher settings directly from the panel. For example, if you
need to change the switcher’s video format, aspect ratio, or configure VISCA control on the
remote port.
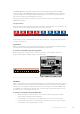
HOME
MIX
FTB
MACRO
SETTINGS
WIPE
MEDIA
PLAYERS
SUPER
SOURCE
KEYS
DVE
BORDER
CAMERA
CONTROL
STINGER
COLOR
AUDIO
DIP
AUX
1
4
7
ENTER
2
5
8
0
3
6
9
RESET
PROGRAM
PREVIEW
SHIFT MACRO
BKGD
KEY 1
KEY 2
KEY 4
KEY 3
ON
ON
ON
ON M/E 1 M/E 2
M/E 3
M/E 4
SHIFT DIP
DVE
STING
DSK 1
TIE
DSK 2
TIE
DSK 1
CUT
DSK 2
CUT
DSK 1
AUTO
DSK 2
AUTO
FTB
MIX
CUT
AUTO
WIPE
ARM
PREV
TRANS
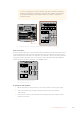
System Control
103Using ATEM Hardware Panels