
User's Manual

For more information on how to record and run macros using the advanced panel, refer to the
‘Using Macros/Recording Macros using an ATEM 1 M/E Advanced Panel’ section.
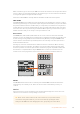
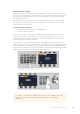
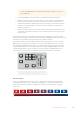
Downstream Keyers
DSK TIE
The DSK TIE button will enable the DSK on the preview output, along with the next transition
effects and tie it to the main transition control so that the DSK can be taken to air with the
next transition.
Because the tied downstream keyer is now tied to the main transition, the transition will happen
at the rate specified in the auto rate setting in the LCD ‘home’ menu. When the DSK is tied,
the signal routing to the clean feed 1 is unaffected.
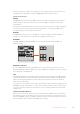
DSK CUT
The DSK CUT button is used to cut the DSK on or off air and indicates whether the DSK is
currently on or off air. The button is illuminated if the DSK is currently on air.
DSK AUTO
The DSK AUTO button will mix the DSK on or off air at the rate specified in the DSK rate
LCD menu setting.
Studio A
Cam 1
Studio A
Cam 2
Studio A
Cam 3
Studio A
Cam 4
Studio A
Cam 5
Media
Player 1
Media
Player 2
Replay
1
Replay
2
Remote
1
Studio A
Cam 1
Studio A
Cam 2
Studio A
Cam 3
Studio A
Cam 4
Studio A
Cam 5
Media
Player 1
Media
Player 2
Replay
1
Replay
2
Remote
1
Studio A
Cam 1
Studio A
Cam 2
Studio A
Cam 3
Studio A
Cam 4
Studio A
Cam 5
Media
Player 1
Media
Player 2
Replay
1
Replay
2
Remote
1
PROGRAM
SHIFT MACRO ON ON ON ON
M/E 1 M/E 2 M/E 3 M/E 4
BKGD
DIPSHIFT
PREV
TRANS
CUT AUTO
DSK 1
CUT
DSK 1
TIE
DSK 2
TIE
DSK 2
CUT
DSK 1
AUTO
DSK 2
AUTO
FTB
DVE STING
MIX WIPE ARM
KEY 1 KEY 2 KEY 3 KEY 4
PREVIEW
HOME SETTINGS
KEYERS
1 2 3
4 5 6
7 8 9
ENTER 0 RESET
DVE STINGER DIP
COLOR
AUDIO AUX
BORDER
CAMERA
CONTROL
WIPE
MEDIA
PLAYERS
SUPER
SOURCE
MIX
FTB
MACRO
Studio A
Cam 1
Studio A
Cam 2
Studio A
Cam 3
Studio A
Cam 4
Studio A
Cam 5
Media
Player 1
Media
Player 2
Replay
1
Replay
2
Remote
1
Studio A
Cam 1
Studio A
Cam 2
Studio A
Cam 3
Studio A
Cam 4
Studio A
Cam 5
Media
Player 1
Media
Player 2
Replay
1
Replay
2
Remote
1
Studio A
Cam 1
Studio A
Cam 2
Studio A
Cam 3
Studio A
Cam 4
Studio A
Cam 5
Media
Player 1
Media
Player 2
Replay
1
Replay
2
Remote
1
PROGRAM
SHIFT MACRO ON ON ON ON
M/E 1 M/E 2 M/E 3 M/E 4
BKGD
DIPSHIFT
PREV
TRANS
CUT AUTO
DSK 1
CUT
DSK 1
TIE
DSK 2
TIE
DSK 2
CUT
DSK 1
AUTO
DSK 2
AUTO
FTB
DVE STING
MIX WIPE ARM
KEY 1 KEY 2 KEY 3 KEY 4
PREVIEW
HOME SETTINGS
KEYERS
1 2 3
4 5 6
7 8 9
ENTER 0 RESET
DVE STINGER DIP
COLOR
AUDIO AUX
BORDER
CAMERA
CONTROL
WIPE
MEDIA
PLAYERS
SUPER
SOURCE
MIX
FTB
MACRO
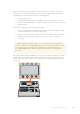
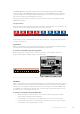
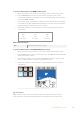
Downstream Keyers and Fade to Black
M/E Numbered Buttons
As some ATEM switchers have multiple M/Es you can select which one you want to control
using the M/E buttons. When an M/E is selected, the LCD menu will change to show the settings
that correspond to that M/E panel.
FTB
The FTB button will fade the program output to black at the rate specified in the FTB rate LCD
menu setting. Once the program output has been faded to black, the FTB button will flash red
until it is pressed again, fading the program output up from black at the same rate. A fade to
black cannot be previewed.
You can also set your switcher to fade audio together with the fade to black by navigating to the
FTB LCD menu and setting AFV to ‘on’. This sets the switcher to fade the audio to silence at the
rate set for the fade to black. If you want audio to remain on during and after the fade to black,
set AFV to ‘off’.
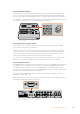
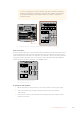
System Control Menu Buttons
The buttons on the top left side of your panel, combined with the LCD and its four soft buttons
are called the system control. When you press a system control button, for example the ‘home’
button, the LCD will change accordingly to show the relevant controls and settings. Use the soft
buttons and knobs above and below the LCD to make changes.
102Using ATEM Hardware Panels