
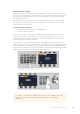
User's Manual
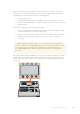
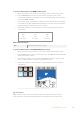

When a transition type is selected, the LCD menu shows the transition rate and provides instant
access to all the corresponding settings for that transition type. Use the soft buttons and knobs
to navigate through the settings and make changes.
The button marked ARM is currently disabled and will be enabled in a future update.
PREV TRANS
The PREV TRANS button enables the preview transition mode allowing the operator to verify a
transition by performing it on the preview output using the fader bar. Once you press this button
the preview transition feature is enabled and you can preview your transition as many times as
you like. This lets you test the transition before going to air and make changes and corrections
as needed. You can even preview stinger transitions! Once adjusted, press the button again to
disable the feature and you are ready to send your transition on air.
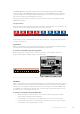
Next Transition
The BKGD, KEY 1, KEY 2, KEY 3, KEY 4 buttons are used to select the elements which will
transition on air or off air with the next transition. Any combination of background and keys can
be selected by pressing multiple buttons simultaneously. Double pressing the BKGD button
selects all of the next transition upstream keyers that are currently on air and copies them to
the Next Transition buttons.
Pressing any of the next transition buttons will clear selection of all others. When selecting
the elements of the next transition, the switcher operator should look at the preview output
because it provides an accurate representation of what the program output will look like after
the transition is completed. When only the BKGD button is selected, a transition from the
current source on the program bus to the source selected on the preview bus will occur.
Studio A
Cam 1
Studio A
Cam 2
Studio A
Cam 3
Studio A
Cam 4
Studio A
Cam 5
Media
Player 1
Media
Player 2
Replay
1
Replay
2
Remote
1
Studio A
Cam 1
Studio A
Cam 2
Studio A
Cam 3
Studio A
Cam 4
Studio A
Cam 5
Media
Player 1
Media
Player 2
Replay
1
Replay
2
Remote
1
Studio A
Cam 1
Studio A
Cam 2
Studio A
Cam 3
Studio A
Cam 4
Studio A
Cam 5
Media
Player 1
Media
Player 2
Replay
1
Replay
2
Remote
1
PROGRAM
SHIFT MACRO ON ON ON ON
M/E 1 M/E 2 M/E 3 M/E 4
BKGD
DIPSHIFT
PREV
TRANS
CUT AUTO
DSK 1
CUT
DSK 1
TIE
DSK 2
TIE
DSK 2
CUT
DSK 1
AUTO
DSK 2
AUTO
FTB
DVE STING
MIX WIPE ARM
KEY 1 KEY 2 KEY 3 KEY 4
PREVIEW
HOME SETTINGS
KEYERS
1 2 3
4 5 6
7 8 9
ENTER 0 RESET
DVE STINGER DIP
COLOR
AUDIO AUX
BORDER
CAMERA
CONTROL
WIPE
MEDIA
PLAYERS
SUPER
SOURCE
MIX
FTB
MACRO
Studio A
Cam 1
Studio A
Cam 2
Studio A
Cam 3
Studio A
Cam 4
Studio A
Cam 5
Media
Player 1
Media
Player 2
Replay
1
Replay
2
Remote
1
Studio A
Cam 1
Studio A
Cam 2
Studio A
Cam 3
Studio A
Cam 4
Studio A
Cam 5
Media
Player 1
Media
Player 2
Replay
1
Replay
2
Remote
1
Studio A
Cam 1
Studio A
Cam 2
Studio A
Cam 3
Studio A
Cam 4
Studio A
Cam 5
Media
Player 1
Media
Player 2
Replay
1
Replay
2
Remote
1
PROGRAM
SHIFT MACRO ON ON ON ON
M/E 1 M/E 2 M/E 3 M/E 4
BKGD
DIPSHIFT
PREV
TRANS
CUT AUTO
DSK 1
CUT
DSK 1
TIE
DSK 2
TIE
DSK 2
CUT
DSK 1
AUTO
DSK 2
AUTO
FTB
DVE STING
MIX WIPE ARM
KEY 1 KEY 2 KEY 3 KEY 4
PREVIEW
HOME SETTINGS
KEYERS
1 2 3
4 5 6
7 8 9
ENTER 0 RESET
DVE STINGER DIP
COLOR
AUDIO AUX
BORDER
CAMERA
CONTROL
WIPE
MEDIA
PLAYERS
SUPER
SOURCE
MIX
FTB
MACRO
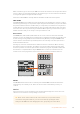
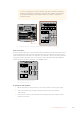
Transition Control Upstream Keyers
ON AIR
The ON AIR indicator buttons above each keyer are labelled ON and indicate which of the
upstream keys are currently on air. These can also be used to immediately cut a key on
or off air.
MACRO
The macro button is used to enable the macro feature which changes the source select row
of buttons to macro buttons corresponding to macro slots.
TIP There are ten macro buttons in the source select row, so if you have macros
recorded to slots greater than ten, you can access these by opening the macro
settings in the LCD menu and changing the macro group using the control knob.
101Using ATEM Hardware Panels