
User's Manual
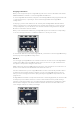
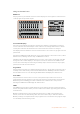

Source Select Bus
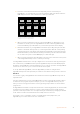
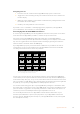
The source select bus works in conjunction with the source names display and is used to assign
sources to auxiliary outputs and keyers. When the macro button is enabled, this row of buttons
is also used for loading and running macros recorded to the corresponding slots. The buttons
will illuminate blue when the macro button is enabled.
The destination display and select bus together show you the routing of sources to keys and
auxiliary outputs. The currently selected source is indicated by an illuminated button. A blinking
button indicates a shifted source. A green illuminated button identifies a protected source.
Protected sources are program, preview, clean feed 1 and clean feed 2.
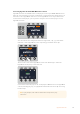
Transition Control and Upstream Keyers
Studio A
Cam 1
Studio A
Cam 2
Studio A
Cam 3
Studio A
Cam 4
Studio A
Cam 5
Media
Player 1
Media
Player 2
Replay
1
Replay
2
Remote
1
Studio A
Cam 1
Studio A
Cam 2
Studio A
Cam 3
Studio A
Cam 4
Studio A
Cam 5
Media
Player 1
Media
Player 2
Replay
1
Replay
2
Remote
1
Studio A
Cam 1
Studio A
Cam 2
Studio A
Cam 3
Studio A
Cam 4
Studio A
Cam 5
Media
Player 1
Media
Player 2
Replay
1
Replay
2
Remote
1
PROGRAM
SHIFT MACRO ON ON ON ON
M/E 1 M/E 2 M/E 3 M/E 4
BKGD
DIPSHIFT
PREV
TRANS
CUT AUTO
DSK 1
CUT
DSK 1
TIE
DSK 2
TIE
DSK 2
CUT
DSK 1
AUTO
DSK 2
AUTO
FTB
DVE STING
MIX WIPE ARM
KEY 1 KEY 2 KEY 3 KEY 4
PREVIEW
HOME SETTINGS
KEYERS
1 2 3
4 5 6
7 8 9
ENTER 0 RESET
DVE STINGER DIP
COLOR
AUDIO AUX
BORDER
CAMERA
CONTROL
WIPE
MEDIA
PLAYERS
SUPER
SOURCE
MIX
FTB
MACRO
Studio A
Cam 1
Studio A
Cam 2
Studio A
Cam 3
Studio A
Cam 4
Studio A
Cam 5
Media
Player 1
Media
Player 2
Replay
1
Replay
2
Remote
1
Studio A
Cam 1
Studio A
Cam 2
Studio A
Cam 3
Studio A
Cam 4
Studio A
Cam 5
Media
Player 1
Media
Player 2
Replay
1
Replay
2
Remote
1
Studio A
Cam 1
Studio A
Cam 2
Studio A
Cam 3
Studio A
Cam 4
Studio A
Cam 5
Media
Player 1
Media
Player 2
Replay
1
Replay
2
Remote
1
PROGRAM
SHIFT MACRO ON ON ON ON
M/E 1 M/E 2 M/E 3 M/E 4
BKGD
DIPSHIFT
PREV
TRANS
CUT AUTO
DSK 1
CUT
DSK 1
TIE
DSK 2
TIE
DSK 2
CUT
DSK 1
AUTO
DSK 2
AUTO
FTB
DVE STING
MIX WIPE ARM
KEY 1 KEY 2 KEY 3 KEY 4
PREVIEW
HOME SETTINGS
KEYERS
1 2 3
4 5 6
7 8 9
ENTER 0 RESET
DVE STINGER DIP
COLOR
AUDIO AUX
BORDER
CAMERA
CONTROL
WIPE
MEDIA
PLAYERS
SUPER
SOURCE
MIX
FTB
MACRO
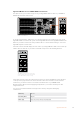
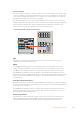
Transition Control and Upstream Keyers
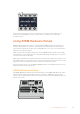
CUT
The CUT button performs an immediate transition of the Program and Preview outputs,
regardless of the selected transition type.
AUTO
The AUTO button will perform the selected transition at the rate specified in the auto rate
setting located in the LCD ‘home’ menu. The transition rate for each transition type is set in
the LCD menu and is displayed when the corresponding transition style button is selected.
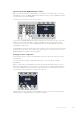
The AUTO button illuminates red for the duration of the transition and the fader bar indicator
illuminates with sequential LEDs to indicate the progress of the transition. If the software control
panel is active, the virtual fader bar also updates to provide visual feedback on the progress
of the transition.
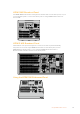
Fader Bar and Fader Bar Indicator
The fader bar is used as an alternative to the AUTO button and allows the operator to manually
control the transition. The fader bar Indicator next to the fader bar provides visual feedback on
the progress of the transition.
The AUTO button illuminates red for the duration of the transition and the fader bar indicator
updates to indicate the progress of the transition. If the software control panel is active, the
virtual fader bar updates simultaneously.
Transition Type Buttons
The transition type buttons allow the operator to select one of five types of transitions; mix,
wipe, dip, DVE and stinger, labelled STING. Transition types are selected by pressing the
appropriately labeled transition type button. The button will illuminate when selected.
100Using ATEM Hardware Panels