
User Manual


Control Panel Display Menu
Using the Display Menu
Use your HyperDeck’s control panel display menu to change your video and audio inputs and
outputs as well as any settings changes you would make in HyperDeck Setup such as trigger
recording, timecode output and your chosen recording codec.
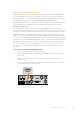
CodecCodec
ProRes
ProRes LT
ProRes Proxy
Uncomp 10-bit
Record
Trigger
ProRes HQ
Codec
ProRes LT
ProRes Proxy
ProRes
ProRes HQ
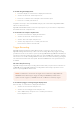
HyperDeck Studio Mini has a list based menu, and HyperDecks that record on SSDs have a
tile based menu, so the position of some settings in the menu may appear slightly different
To change a setting in the menu:
1 Press the ‘display’ or ‘menu’ button to display the main menu.
2 Use the jog/shuttle wheel on the front of HyperDeck to highlight different options.
3 Press the ‘set’ button to confirm a selection.
4 To return to a previous menu, press the ‘menu’ button on HyperDeck Studio Mini,
orscroll to the ‘return’ arrow and press ‘set.
5 Press the ‘display’ or ‘menu’ button to exit.
INPUT
DISP
SET
REM
JOG
Codec
ProRes HQ
ProRes
ProRes LT
ProRes Proxy
Codec
Record
Trigger
Uncomp 10-bit
INPUT
DISP
SET
REM
JOG
Codec
ProRes HQ
ProRes
ProRes LT
ProRes Proxy
Codec
Record
Trigger
Uncomp 10-bit
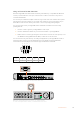
Press the ‘display’ or ‘menu’ button to enter the LCD menu where you
can select between various codecs and change settings
Selecting Timecode Source
When recording from HD-SDI video sources that provide embedded SMPTE RP 188 metadata,
you can record the embedded timecode from the video source instead of using timecode
generated by your HyperDeck.
26Control Panel Display Menu