
User Manual


To format using your HyperDeck:
1 Insert the media you want to format into either of the SD card or SSD slots.
2 Press the ‘disp’ or ‘menu’ button on your HyperDeck’s control panel.
3 On HyperDecks that record on SSDs, turn the jog/shuttle wheel and press the set
button to select ‘format SSD’ on the LCD menu.
On HyperDeck Studio Mini, turn the jog/shuttle wheel and use the set button to enter
the ‘record’ menu on the LCD and select ‘format card’.
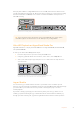
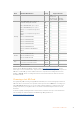
Main MenuVideo
Timecode
Setup
Format
SSD
Record
Select
Open
SET
Audio Channels
Format Card
Record Trigger
Codec
4 Channels
None
ProRes HQ
Record
Turn the jog/shuttle wheel clockwise to select ‘format SSD’ on the LCD menu.
OnHyperDeck Studio Mini, the ‘format card’ setting is in the ‘record’ menu.
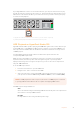
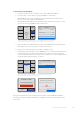
4 Select the SD card or SSD you want to format on the LCD using the jog/shuttle wheel.
Remember to press the ‘set’ button to confirm your selection.
5 Now set your desired format from the ‘HFS+’ or ‘exFAT’ options.
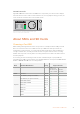
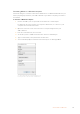
6 A warning message will appear on the LCD asking you to confirm the format. Make sure
you have backed up any important data before you confirm as this action cannot be
undone. Confirm the format by selecting ‘format’ for SD cards, or ‘format SSD’ using the
jog/shuttle wheel and pressing the ‘set’ button.
Select Format
exFat
OS X Extended
Format SSD 1
exFAT
Format
SSD 1
Format
SSD 2
HFS+
Set your desired format from the HFS+ or exFAT options. OnHyperDeck
Studio Mini, HFS+ is labeled ‘OS X Extended’
Cancel
This will erase all data from your card
This action cannot be undone.
Format SD 2 to OS X Extended?
Format
!
Format SSD 1 as HFS+?
Cancel Format SSD
This action cannot be undone.
Your disk’s contents will be erased.
Confirm the format by using the jog/shuttle wheel and pressing the set button
A progress bar will show you the formatting progress. When your HyperDeck has finished
formatting, ‘formatting complete’ will display on the LCD. Press the ‘set’ button again to return
to the menu.
18About SSDs and SD Cards