
User Manual


Table Of Contents
- Getting Started
- Using HyperDeck
- About SSDs
- HyperDeck Utility
- About Ultra HD 4K
- Accessing Your Clips
- Status Indicators
- Using the Display Menu on HyperDeck Studio Models
- Selecting Timecode Source
- SDI Start/Stop Recording
- Timecode Run Recording
- Shuttling with HyperDeck Shuttle
- Jog and Shuttle with HyperDeck Studio Models
- Ref Input
- RS-422 Control
- Installing the HyperDeck Shuttle Mounting Plate
- Using Your Favorite Editing Software
- Using Blackmagic Media Express
- Using Blackmagic UltraScope
- Using Blackmagic Disk Speed Test
- Developer Information
- Help
- Warnings
- Warranty
Getting Started
8
Recording Video
HyperDeck ships ready to record immediately without having to configure any settings. All you need is a
recommended SSD formatted in the HFS+ or exFAT format. If HyperDeck records from a video source that
contains closed caption data, the QuickTime or MXF movie will be recorded as well as a separate .MCC file
containing the closed caption data.
Recording Video with HyperDeck Shuttle
Step 1. Insert your formatted SSD. As HyperDeck Shuttle reads the disk, the SSD light will illuminate.
When the light goes off, HyperDeck Shuttle is ready to record.
Step 2. HyperDeck Shuttle automatically detects whether SDI or HDMI is connected. The Video status
LED lights up when a valid video signal is detected.
Step 3. Press the Record button and the SSD light will flash to indicate SSD activity. If the Stop button
starts flashing while recording, there are only 3 minutes of recording time left on the SSD. Make
sure you have another empty SSD ready so you don’t miss the next take.
Step 4. Press the Stop button to finish recording.
Recording Video with HyperDeck Studio Models
Step 1. Insert your formatted SSD into either SSD slot. The slot light will illuminate green as HyperDeck
reads the disk. When the slot light goes off, HyperDeck Studio is ready to record.
Step 2. Press the INPUT button once while the stop button is illuminated to preview the video
source on the LCD before recording. If you don’t see the video you want, press INPUT again
to switch inputs.
Step 3. Press the record button to start recording to the SSD instantly. A looping red light on the SSD slot
indicates the SSD is recording. During recording, you can press and hold the record button to
switch recording from one SSD to the other instantly.
Step 4. Press the Stop button to finish your recording.
If the record button flashes, this means the disk is not fast enough and recording cannot keep up. We
recommend you change to a compressed recording format such as ProRes or DNxHD, or use a faster
recommended SSD for uncompressed or Ultra HD 4K recording.
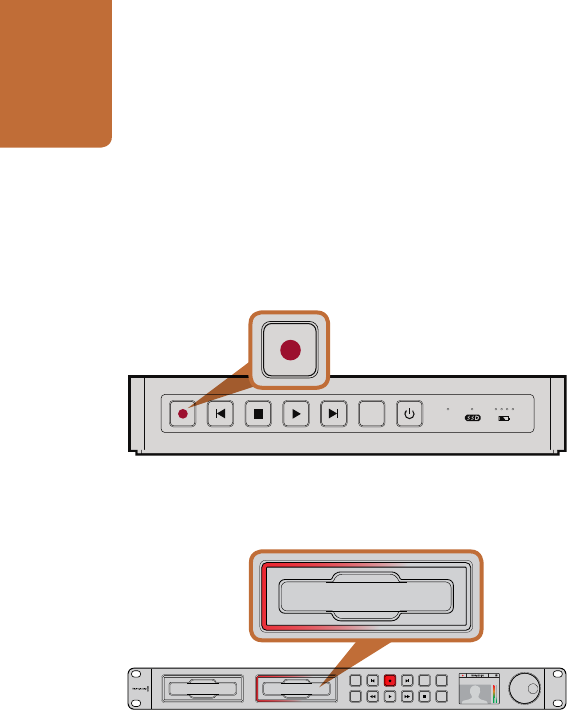
The record button lights up red when HyperDeck Shuttle
is recording video.
SSD slots on HyperDeck Studio models have rotating LEDs to
show the unit is recording video.
DISP
VIDEO
INPUT
DISP
SET
REM
JOG
01:42:56:12
SSD
2
INPUT
DISP
SET
REM
JOG
01:42:56:12
SSD
2
DISP
VIDEO