
User Manual


Table Of Contents
- Getting Started
- Using HyperDeck
- About SSDs
- HyperDeck Utility
- About Ultra HD 4K
- Accessing Your Clips
- Status Indicators
- Using the Display Menu on HyperDeck Studio Models
- Selecting Timecode Source
- SDI Start/Stop Recording
- Timecode Run Recording
- Shuttling with HyperDeck Shuttle
- Jog and Shuttle with HyperDeck Studio Models
- Ref Input
- RS-422 Control
- Installing the HyperDeck Shuttle Mounting Plate
- Using Your Favorite Editing Software
- Using Blackmagic Media Express
- Using Blackmagic UltraScope
- Using Blackmagic Disk Speed Test
- Developer Information
- Help
- Warnings
- Warranty
Using HyperDeck
19
Timecode Run Recording
HyperDeck also supports timecode run recording, which is similar to start/stop recording, but is only used if
your HD-SDI camera does not support trigger recording via HD-SDI.
To set up timecode run recording:
Step 1. Go into your camera's timecode settings and change them from "free run timecode" to "record
run timecode".
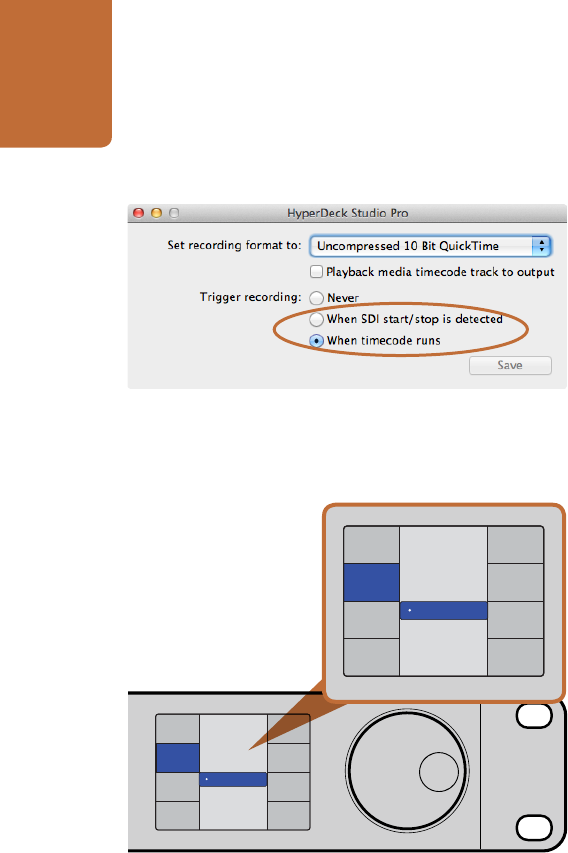
Step 2. In HyperDeck Utility, set Trigger recording to "When SDI timecode runs".
Step 3. If using HyperDeck Studio, press the REM button after setting Timecode Run Recording in
HyperDeck Utility. The REM button must be illuminated on the unit to allow trigger recording.
To set this on HyperDeck Studio models using the Display menu:
Step 1. Press the DISP button to bring up the main menu.
Step 2. Scroll to the Record menu and press SET.
Step 3. Scroll to the Record Trigger menu and press SET.
Step 4. Select Timecode Run and press SET to confirm your selection. Press DISP to exit.
Step 5. Press the REM button. The REM button must be illuminated on the unit to allow trigger recording.
Now whenever your HyperDeck detects the timecode running via HD-SDI it will start recording. Recording
will stop whenever the timecode stops.
Be careful if your HyperDeck is connected to the SDI output of a video router, as any change to the video
source might cause HyperDeck to start recording unexpectedly due to a change in timecode being
detected via HD-SDI.
Use the HyperDeck Utility to enable Timecode Run recording.
Use the DISP menu on HyperDeck Studio models to set
Timecode Run recording.
INPUT
DISP
SET
REM
JOG
Record Trigger
SDI Start/Stop
Codec
Record
Trigger
None
Timecode Run
INPUT
DISP
SET
REM
JOG
Record Trigger
SDI Start/Stop
Codec
Record
Trigger
None
Timecode Run