
User's Manual


By tightening the screws on both sides of the RS-422 connector, you
can prevent any interruption to the connection.
Enabling Remote Control on your HyperDeck
Now that your HyperDeck Extreme 8K HDR is connected, press the remote button labelled
‘rem’ on the unit’s front panel. This lets your HyperDeck disk recorder knowthat you are
assigning remote control to HyperDeck Extreme Control.
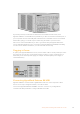
Playback using HyperDeck Extreme Control
The two rows of numbered soft buttons on the HyperDeck Extreme Control correspond to the
numbered RS-422 ports on the rear panel. Earlier in this section we connected HyperDeck
Extreme 8K HDR to RS-422 port 1. This means you can control that HyperDeck as either the
record or playback unit by selecting unit 1 on the playback and record buttons.
To enable the HyperDeck as a playback unit, simply press the ‘1’ button in the playback row.
The ‘1’ playback button will now be green.
If it’s not already illuminated, tap on the ‘player’ button. The timecode display and status
indicators on your HyperDeck controller will match the playback unit. Your HyperDeck
recorder is ready to be operated using HyperDeck Extreme Control’s powerful deck controls.
You can use the soft touch transport controls or the search dial and mode
buttons to control your HyperDeck Extreme 8K HDR.
Tap on the ‘shuttle’ button above the search dial. You can now turn the dial right and left to
shuttle through your video. Press the ‘stop’ button to exit shuttle mode. Now press ‘play’ for
real time playback, or the skip buttons to navigate from recorded clip to recorded clip.
55Getting Started with HyperDeck Extreme Control