
User's Manual


For Blackmagic RAW files from 12G video assist models, you have the flexibility to use
the camera’s original gamut and gamma, or treat them as you would other .braw files
using the Blackmagic Design color space and a Blackmagic gamma, such as
Blackmagic Design Film.
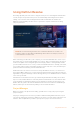
Using the default camera settings
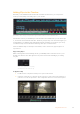
With your clip selected on the ‘color’ page, go to the ‘camera raw’ tab in the lower
left corner. You will notice on the left hand side that the color space and gamma
settings match your camera settings. You can change the exposure for any file by
dragging the slider control. You can also adjust the white balance for files shot using
Panasonic EVA1 using the color temp and tint sliders.
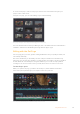
Using Blackmagic RAW settings
To use the Blackmagic color space, simply select Blackmagic Design from the
drop down ‘color space’ menu and then select a Blackmagic Design gamma. Now you
have all the gamma controls of .braw files recorded on Blackmagic Design cameras.
It’s worth noting that highlight recovery and ISO controls are disabled for Blackmagic
RAW clips recorded on Video Assist 12G HDR.
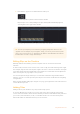
In the ‘camera raw’ tab, select ‘clip’ from the ‘decode using’ drop down menu
to make adjustments to your clip’s Blackmagic RAW settings
Once you have set DaVinci Resolve to enable clip settings for Blackmagic RAW, the clip settings
and gamma controls are now adjustable. Adjusting these settings to optimize your clips can
bring them close to a full primaries grade. This is especially powerful when using DaVinci
Resolve’s scopes which can help you neutralize and balance the clips ready for applying a look.
The following information contains descriptions for the clip and gamma controls.
ISO
The ISO value can be changed by increasing or decreasing this setting. This setting is helpful
if you need to set the clip to a brighter or darker starting point for optimization.
Highlight Recovery
Check the box to reconstruct highlight information in clipped channels using information from
non-clipped channels.
Color Temp
Adjust the color temperature to warm or cool the image. This can be used to help neutralize
the color balance in each image.
Tint
Adjusting this setting will add green or magenta into the image to help balance the color.
60Using DaVinci Resolve