
User's Manual


Plugging in Video
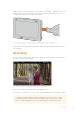
The next step is to plug your SDI or HDMI source videointo the MiniBNC, BNC or HDMIinput.
Mini BNC to regular BNC cables can be purchased from your nearest professional video
equipment stores.
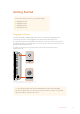
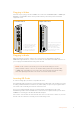
Left Side Panel Right Side Panel
Connect your source video
to the SDI or HDMI input
on the left side. Connect
an HDMITV or SDI
monitor by plugging into
the HDMI or SDI output.
You can listen to the audio
via the built in speaker, or
by plugging headphones
into the headphones
jack. The speaker will be
muted during recording
and monitoring.
Plugging in Audio
When plugging in your video, audio is also connected as it’s embedded in the SDI or
HDMI video signal. However, 7” video assist models also have built in mini XLR connectors so
you can plug in external balanced analog audio as well.
NOTE On the 7” video assist model, you can set the audio settings to record
analog channels 1 and 2, orchoose one channel analog audio and one channel SDI
or HDMI audio, depending on your source video. For more information about analog
audio andadjusting levels refer to the ‘audio’ section later in this manual.
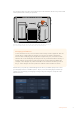
Inserting SD Cards
To start recording clips, first insert a compatible SD card.
For high quality HD recording, we recommend high speed UHS-I SD cards. However, if you are
recording standard definition or lower bit rate, lower quality compression you might be able to
use slower cards. Generally, the faster the cards the better.
If you are recording Ultra HD, then we recommend high speed UHS-II type SD cards.
For Blackmagic Video Assist 12G HDR these cards need to be capable of write speeds above
224MB/s for recording up to ProRes HQ Ultra HD 2160p60.
The 7” video assist models also have two SD card slots. You can record to either one, or insert
two SD cards for continuous recording or fast media change overs.
7Getting Started