
User's Manual


When formatting you can also add the name for your card or drive using the edit box
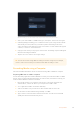
3 Select your desired HFS+ or exFAT format type, then tap the ‘format card’ icon again.
4 A warning will appear asking you to confirm the format. If your storage media contains
data already recorded, make sure you back it up before formatting as this action
cannot be undone. Hold down the ‘format’ icon for three seconds until the tick appears
continue, or ‘cancel’ to cancel the format.
5 A progress bar shows you the progress of the format. ‘Formatting complete’ will appear
when the formatting has finished.
6 Tap the ‘ok’ icon to return to the storage settings.
TIP You can also format storage while recording on another storage slot, for example,
on the 7” video assist models you can format card 2 while recording to card 1.
Formatting Media using a Computer
SD cards and USB-C flash disks can also be formatted using a Mac or Windows computer.
Preparing SD Cards on a Mac computer
Use the ‘disk utility’ application included with Mac to format your media in the HFS+ or exFAT
formats. If your storage media already has files recorded on them, remember to back up your
media as all data will be lost when it is formatted.
1 Plug the SD card into your computer’s SD card slot or via an SD card reader. For
external drives, connect the drive to your computer via a USB-C cable.
2 Go to ‘applications/utilities’ and launch ‘disk utility’.
3 Click on the disk icon of your SD card or drive and then click the ‘erase’ tab.
4 Set the format to ‘Mac OS Extended (journaled)’ or “exFAT”.
5 Type a ‘name’ for the new volume and then click ‘erase’. Your SD card or drive will
quickly be formatted and made ready for use.
48Storage Media