
User's Manual


To select your active drive on Blackmagic Video Assist 12G HDR:
1 Tap the ‘drive’ icon to open the storage settings.
2 Tap on ‘drive list’.
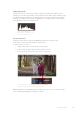
3 Tap the drive you want to select, it will highlight blue. Tap ‘use drive’. The active drive is
identified by the blue vertical line to the left of the drive icon.
4 Tap ‘exit’ to return to the previous storage settings screen.
5 Tap ‘exit’ again to leave the storage settings screen.
Drive list view on 12G video assist models
It’s worth noting that the ‘use drive’ button will be disabled when the selected drive is already
active, or there is only one drive available.
You can also format your storage via the storage settings menu. Refer to the ‘formatting storage
media using your video assist’ section later in this manual for more information.
Storage indicator icons slightly vary between video assist models, and can display the number,
name, progress bar and status of the media slots, or just the number and status.
Number
The number indicates the storage slot. For example, Blackmagic Video Assist 12G HDR slot
‘1’ and ‘2’ are the two SD card slots and slot ‘3’ is for the external drive. Slot ‘2’ on the 5”
12G video assist is for any external drive connected via USB-C. You can add the media name
inthe formatting process.
Name
The name of your storage will display to the right of the slot number so you can make sure you
are recording to the right card or drive at all times.
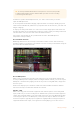
Progress Bar
The bar icon will be either blue, white or red depending on its current status. The intensity of
the color will also display the used space on the card.
A blue bar indicates the active drive. If you press play, playback will start from this
card or drive. If you want to record video, it will be to this card or drive.
A white bar indicates there is an SD card or external drive connected,
but not active. A solid white icon indicates the drive is full.
The bar will be red during recording.
29Changing Settings