Installation and Operation Manual Blackmagic Video Assist July 2020 English, 日本語, Français, Deutsch, Español, 中文, 한국어, Русский, Italiano, Português and Türkçe.
English Welcome! Thank you for purchasing your Blackmagic Video Assist. In 2015 we launched the original Blackmagic Video Assist to help you shoot better quality video on any type of camera. We are now excited to introduce Blackmagic Video Assist 12G HDR to the video assist family! We are extremely excited to have designed the Blackmagic Video Assist family of products. We think they are the perfect solution to help you shoot better video on any type of camera.
Contents Blackmagic Video Assist Getting Started 5 Formatting Media using a Computer 48 Plugging in Power 5 Working with Files from SD Cards 50 Plugging in Video 7 Checking Disk Speed 50 Plugging in Audio 7 Blackmagic Video Assist Setup 51 Inserting SD Cards 7 Updating the Internal Software 51 Using DaVinci Resolve 53 Recording 8 Remote Control via the LANC Connector 9 Project Manager 53 Continuous Recording 9 Editing with the Cut Page 54 Recording Clean HDMI fr
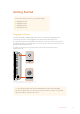
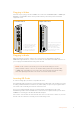
Getting Started This section shows you how to get started including: ■ Plugging in Power ■ Plugging in Video ■ Plugging in Audio ■ Inserting SD cards Plugging in Power Getting started with your Blackmagic Video Assist is as simple as plugging in power, connecting your video source, plugging in your audio and inserting an SD card. To supply power, plug in the supplied power adapter to your video assist’s power input on the right side panel.
You can also power your video assist using Sony L-series batteries that are very common and can be purchased in a variety of capacities. Insert the battery into the slot and slide down until it clicks into place. To remove, press and hold the button above the battery and slide the battery out Charging your Batteries L-series batteries are very common and used in a variety of video equipment. This also means there is a wide variety of chargers you can use to recharge your batteries.
Plugging in Video The next step is to plug your SDI or HDMI source video into the Mini BNC, BNC or HDMI input. Mini BNC to regular BNC cables can be purchased from your nearest professional video equipment stores. Left Side Panel Right Side Panel Connect your source video to the SDI or HDMI input on the left side. Connect an HDMI TV or SDI monitor by plugging into the HDMI or SDI output. You can listen to the audio via the built in speaker, or by plugging headphones into the headphones jack.
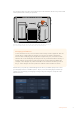
Before using your cards, you will need to format them to either HFS+ or exFAT formats. It’s easy to format your media via the ‘storage’ settings. For information on formatting, refer to the ‘storage media’ section for more later in this manual. To start recording you’ll need to insert an HFS+ or exFAT formatted UHS-I or UHS-II SD card. You can easily format your SD card using the ‘storage’ settings in the touchscreen menu. That’s all there is to getting started.
On 5” video assist models, swipe the screen up or down to reveal or hide the toolbars. NOTE When recording from an HDMI or SDI camera, make sure the output is clean with overlays turned off as any overlays that are present in your camera’s video output will be recorded with your image. Please refer to the section titled ‘recording clean HDMI from DSLR cameras’ for more information.
Recording Clean HDMI from DSLR Cameras Some DSLR cameras record 8-bit video internally, and some can provide a clean video image via their HDMI output. By plugging the DSLR camera’s HDMI output into your video assist, you can bypass the camera’s internal compression and record using high quality 10-bit ProRes or Avid DNx codecs. Some DSLR cameras can output 10-bit 4:2:2, which is higher quality video than their internally recorded 8-bit 4:2:0 compression.
TIP Scrub clips forwards or backwards by dragging the scrubbing slider left or right, or by swiping the screen to jog through the video. Jog forwards or backwards by swiping the video left or right. You can choose to display skip buttons or the histogram in the lower toolbar. When the ‘display histogram’ option in the setup tab of the dashboard menu is switched ‘on’, only the ‘record’, ‘play’ and ‘stop’ buttons will be visible.
The lower toolbar includes transport controls, storage indicators and audio meters. A display histogram can also be turned on via the menu to appear over the skip buttons on the lower left of the toolbar. TIP Both toolbars on the 5” video assist models can be removed from view by swiping the screen up or down. On the 7” models, the upper toolbar will remain in view at all times.
Blackmagic Video Assist Settings and Features Your video assist displays overlays on the LCD to help with exposure, focus, composition and framing when connected to a camera. These settings can be accessed via the ‘monitor overlay’ icon in the top left corner of your video assist. You can also use the ‘monitor’ tab of the dashboard menu to toggle these settings on or off individually, or disable them all by selecting ‘clean feed’.
Edge lines are extremely effective. They can be so pronounced that you can even monitor the depth of your focal plane, plus watch it move closer or further into your shot as you adjust your camera’s focus ring. Changing the color of the edge lines can also make them easier to see in conditions where their color may match the image. If you find lines are too visually intrusive, you can select ‘peak’ levels instead.
Grids Your video assist features three types of framing assistance. Thirds Thirds are an extremely powerful tool to help compose your shots with two vertical and horizontal lines placed in each third of the image. The human eye typically looks for action near the points where the lines intersect, so it’s helpful to frame key points of interest in these zones. Crosshairs The ‘crosshairs’ setting places a crosshair in the center of the frame.
The following chart shows how the colors correspond to specific tonal values. False Color Chart Your video assist also features controls to adjust the LCD brightness, contrast and saturation. These controls can be accessed via the ‘monitor overlay’ icon. Contrast Increases or decreases the range between the bright and dark areas of the image. High contrast can reveal detail and depth in the image, and low contrast can make the image appear soft and flat.
This alert lets you know that you are near the temperature limit for that screen brightness value. From here you have two options: Option 1 – Lower the screen brightness manually Tap on the alert to reveal the brightness slider. The slider control will display the current highest nit value available. Drag the slider to the left to reduce the value. The temperature alert will disappear once the unit temperature decreases.
Blackmagic Video Assist 3G codec options Supported Codecs ProRes codecs are recorded as QuickTime files. DNxHD and DNxHR files can be recorded as QuickTime or native MXF files where MXF appears in the codec name. Refer to the following table for more details regarding the codec options.
Format Input video resolution and frame rate is displayed in the ‘format’ section of the upper toolbar. For example, 2160p29.97, 2160p25, 1080p59.94, etc. The following video input and output formats are supported: SDI Input and Output SD Video Standards 525i59.94 NTSC, 625i50 PAL HD Video Standards 720p50, 720p59.94, 720p60 1080p23.98, 1080p24, 1080p25, 1080p29.97, 1080p30, 1080p50, 1080p59.94, 1080p60 1080PsF23.98, 1080PsF24, 1080PsF25, 1080PsF29.97, 1080PsF30 1080i50, 1080i59.
Timecode During recording or playback, the timecode view at the top of the display will update to show you the current time of your clip. Select between timeline or clip timecode, or even SMPTE. Simply tap the timecode display to toggle between SMPTE and clip timecode. SMPTE timecode mode is indicated by a ‘tc’ icon to the right. The time counter displays the timeline timecode. The timecode display will appear red while the unit is recording in both timecode and time counter modes.
Blackmagic Video Assist features additional timecode functions via the ‘setup’ tab of the dashboard menu. Timecode input options on 5” models Timecode Input There are three timecode input options available when recording. Video Input Selecting video input will take the embedded timecode from SDI and HDMI sources with embedded SMPTE RP 188 metadata. This will maintain sync between your SDI or HDMI source and the file recorded on your video assist.
Timecode Output You can select your timecode output from two options. This also selects your timecode view in the upper toolbar. Timeline Tap the timeline option to output your timeline timecode. Clip The clip option will output the timecode of your clip. HDR Blackmagic Video Assist 12G HDR’s ultra bright display is perfect for HDR workflows. The wide color gamut displays 100% of the DCI-P3 color space and brightness controls let you work even outside in bright sunlight.
During operation, your video assist will use the battery with the lowest charge first, then swap over to the other when depleted without interruption. The battery icon will turn red once the remaining capacity is lower than 25%. Video Scopes Blackmagic Video Assist features a set of four real time video scopes that you can use to monitor the luminance and chroma levels of your video signal. You can choose to display a waveform, parade, vectorscope or histogram.
Tapping the ‘preview icon’ displays the scopes full screen, while displaying the video image in the top right corner. This provides another option to view both scopes and the video image at the same time, but lets you study the scopes in greater detail. You can also move the preview to a different area by dragging it to a new location.
RGB Parade The RGB parade shows separate waveforms displaying the luminance of each red, green and blue color channel. By showing a comparison of each channel, the parade scope makes it possible to monitor the levels of each channel, plus spot color casts by comparing the highlights, midtones and shadows between each channel. For example, if the shadows are higher in the blue channel, your blacks will have a shade of blue to them.
The vectorscope displays the overall range of color hue and saturation within the image TIP When monitoring a video signal that contains skin tone, you will want to keep your warm color saturation along a line at approximately 10 o’clock on the vectorscope. This is known as the “fleshtone line” and is based on the color of blood beneath the skin’s surface. The fleshtone line is therefore applicable to all skin pigmentations and is the best way to ensure the skin tones look natural.
The histogram shows the distribution of the luminance, or the black to white information along a horizontal scale Your video is likely being clipped if the information bunches to a hard edge at 0% or above 100% along the horizontal scale. Video clipping is undesirable when you are shooting, as detail in the blacks and whites must be preserved if you subsequently want to perform color correction in a controlled environment.
Display Histogram The left side of the on screen meters displays a histogram showing the distribution of the luminance in your video. Pure black is on the far left side of the display and pure white is on the far right of the display. When the video signal sharpens to a point at the bottom edges within these limits you’ll know your shadows and highlights are not clipping, which means details in the tonal ranges of your video are preserved.
To select your active drive on Blackmagic Video Assist 12G HDR: 1 Tap the ‘drive’ icon to open the storage settings. 2 Tap on ‘drive list’. 3 Tap the drive you want to select, it will highlight blue. Tap ‘use drive’. The active drive is identified by the blue vertical line to the left of the drive icon. 4 Tap ‘exit’ to return to the previous storage settings screen. 5 Tap ‘exit’ again to leave the storage settings screen.
Status Media status will show either the capacity remaining on the media or the slot status. Capacity remaining When your SD card or drive has space remaining, the duration available will be displayed in hours:minutes:seconds based on the current source format and your chosen codec and quality settings. If there is less than an hour left, it will display minutes:seconds remaining only. When recording, the duration will change to red when there is less than 5 minutes available.
TIP To avoid potential feedback when a microphone is connected, the speaker is enabled during playback, but is disabled while your video assist is recording or monitoring the video input. In addition to speaker and headphone levels, on 7” video assist models you can also adjust the XLR input levels. To record optimum audio without clipping, adjust the sliders on each input. Ideally your peak audio levels should fall in the yellow zone.
optimize the recording level. To bypass the XLR analog inputs and maintain the embedded SDI or HDMI channels 1 and 2 from your source video, on 12G video assist models you can set to record your xlr inputs to none. On 3G video assist models, select video. NOTE Your video assist remembers your settings even after power cycling. Make sure you reset your audio settings when changing your connections.
Monitor Display 3D LUT Tap the settings toggle switch to turn your selected display 3D LUT on or off. The display 3D LUT option will be disabled when no display LUT is selected. For information on how to load a LUT, see the ‘LUTs’ tab in the dashboard menu later in this manual. Blue Only Your video assist features a ‘blue only’ mode that displays only the blue channel, represented as a black and white image.
Software Version Displays the current software version. Tally Light LED A tally light on the top that illuminates red when your video assist is recording. This is a particularly useful feature when recording with a DSLR that does not provide an option to display a tally light during recording. Toggle the option to turn tally on or off. LED Brightness To set the brightness of the tally light LED, tap ‘low,’ ‘medium,’ or ‘high.
Display Histogram The histogram display on the lower toolbar will be off by default. If you want to turn the histogram display on, toggle the ‘display histogram’ switch to on. 3G-SDI Output Some broadcast equipment can only receive level A or level B 3G-SDI video. To maintain compatibility, tap either ‘level A’ or ‘level B’. Factory Reset To reset the video assist to its default factory settings, tap the ‘reset’ button.
To select your display LUT: 1 Tap the ‘LUTS’ tab on your video assist dashboard menu. 2 Select the LUT you wish to use by tapping on it to highlight it blue. 3 Tap the tick icon to select the LUT. A blue vertical line will appear on the left of the LUT icon to indicate it is selected. Entering Metadata Metadata is information saved inside your clip, such as take numbers, lens information and other identifying details. This is extremely useful when sorting and processing footage in post production.
When the video assist is in playback mode, ‘slate for’ displays the clip the slate applies to and shows the ‘good take’ button. In standby mode, the slate is for ‘next clip’ and shows the ‘good take last clip’ button. Slate for This setting shows the clip which the metadata currently displayed in the ‘clip’ applies to. In ‘playback’ mode it applies to the current clip. In ‘standby’ mode it refers to the next clip you record. Lens Data The lens data field displays the lens type information.
The shot types available are: WS wide shot MS medium shot MCU medium close up CU close up BCU big close up ECU extreme close up When entering ‘scene’ metadata, the video assist prompts you with scene number suggestions to the left of the touch keyboard, and shot types to the right Take The ‘take’ indicator shows the take number for the current shot. You can adjust it by tapping the left or right arrows on either side of the take number, or tapping the indicator to enter the take number editor.
Tap ‘A’ to enable ‘auto take increment’ when in ‘standby’ mode. This will automatically advance the take number for each clip recorded. A small ‘A’ appears next to the take number on the slate when enabled. When entering ‘take’ metadata, prompts for additional shot types will appear to the right of the touch keyboard Good take Tap the ‘good take’ indicator to tag good takes for easy recall in post production. This button applies the ‘good take’ tag to the clip currently being viewed in ‘playback’ mode.
Project name Displays your current project name. Tap the pencil icon to change the project name. Director Displays the director’s name for the current project. Tap the pencil icon to change the director name. Camera Displays a single letter camera index. Tap the pencil icon to change the camera index. Camera Operator Displays the camera operator. Tap the pencil icon to change the camera operator name.
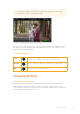
NOTE You can clear lens data at any time by tapping the ‘reset lens data’ icon in the ‘lens data’ menu. If you have manually entered any information into these fields, you will need to reset the lens data the next time you mount a lens, otherwise the manually entered value will remain. Recording Blackmagic RAW on Video Assist 12G HDR With 12G video assist models you can record Blackmagic RAW from Canon C300 II, Panasonic EVA1 and SIGMA fp directly to your video assist.
Panasonic EVA1 1 Press the ‘menu’ button on the side of the camera to reveal the menu in the viewfinder. 2 Using the touchscreen or menu jog/dial wheel, select ‘system settings’ followed by ‘system mode’. 3 From the ‘SDI RAW’ option, select either S35 5.7K for native resolution, crop 4K or crop and mix 2K. 4 Press the ‘menu’ button to return to the previous menu. When an ‘SDI RAW’ option is selected, the option to record internally is disabled.
Blackmagic RAW also includes powerful metadata support so the software reading the files knows your camera settings. If you like shooting in video gamma because you need to turn around edits quickly and you don’t have time for color correction, then this metadata feature means you can select video gamma, shoot in video gamma, and the file will display with video gamma applied when you open it in software.
When using Blackmagic RAW in constant quality you will see the settings are Q0 and Q5. These are the compression parameters passed to the codec and they are setting how much compression is applied in a more technical way. This setting is different because the codec operates differently between constant bitrate vs constant quality. In this constant quality setting, you really cannot tell what the file size ratio will become as it varies a lot based on what you are shooting.
Blackmagic RAW in DaVinci Resolve Settings can be adjusted for each Blackmagic RAW file, and then saved as a new sidecar file from the ‘Camera RAW’ tab in DaVinci Resolve for creative effect or optimized viewing. This also means you can copy your media for another DaVinci Resolve artist and they will have access to your modified gamma settings automatically on import. For more information on how to use Blackmagic RAW in DaVinci Resolve, see the ‘Using DaVinci Resolve’ chapter in this manual.
Which SD cards should I use with Blackmagic Video Assist 12G? The following SD cards are recommended for Ultra HD using Apple ProRes and Avid DNx codecs up to 60 frames per second: Brand Card Name Storage Wise Wise SD2-128U3 SDXC UHS-II 128GB Sony Sony Tough SF-G128T 128GB SanDisk SanDisk Extreme Pro 32GB The following SD cards are recommended for HD using Apple ProRes and Avid DNx codecs up to 60 frames per second: Brand Card Name Storage SanDisk Extreme Pro UHS-I 95MB/s 64GB The follow
Which disk should I use with Blackmagic Video Assist 12G? The following USB-C drives are recommended for Ultra HD using Apple ProRes and Avid DNx codecs up to 60 frames per second: Brand Card Name Storage Wise Wise PTS-256 Portable 4K SSD 256GB Wise Wise PTS-512 Portable 4K SSD 512GB Wise Wise PTS-1024 Portable 4K SSD 1TB Formatting Storage Media using your Video Assist It’s very easy to format your storage media using the storage settings.
When formatting you can also add the name for your card or drive using the edit box 3 Select your desired HFS+ or exFAT format type, then tap the ‘format card’ icon again. 4 A warning will appear asking you to confirm the format. If your storage media contains data already recorded, make sure you back it up before formatting as this action cannot be undone. Hold down the ‘format’ icon for three seconds until the tick appears continue, or ‘cancel’ to cancel the format.
Use ‘disk utility’ on Mac to erase your USB-C flash disk in the Mac OS Extended ( journaled) or exFAT format. Preparing Storage Media on a Windows computer The ‘format’ dialog box can format an SD card in the exFAT format on a Windows PC. Remember to back up anything important from your media as all data will be lost when it is formatted. 1 Plug an SD card into your computer’s SD card slot or via an SD card reader. For external drives, connect the drive to your computer via a USB-C cable.
Working with Files from SD Cards You can access your ProRes or DNx files straight from your SD cards with any Mac or Windows computer that features an SD card slot or by using an SD card reader. 1 Remove the SD card from your video assist and insert it into the SD card slot of your computer, or SD card reader. The SD card can be accessed the same way as you would an external hard drive, USB drive or any other media storage device attached to your computer.
Blackmagic Disk Speed Test interface Blackmagic Video Assist Setup Updating the Internal Software Updates for your video assist’s internal software will be available on the Blackmagic Design website. We recommend downloading the software and updating your video assist so you can benefit from new features and improvements. To update the internal software using Mac: 1 Download and unzip Blackmagic Video Assist Setup. 2 Open the resulting disk image and launch the Blackmagic Video Assist Setup Installer.
To update the internal software using Windows: 1 Download and unzip Blackmagic Video Assist Setup. 2 You should see a Blackmagic Video Assist Setup folder containing this manual and the Blackmagic Video Assist Setup installer. Double-click the installer and follow the onscreen prompts to complete the installation. 3 After installing the latest Blackmagic Video Assist Setup, connect a USB type C cable from your video assist to your computer.
Using DaVinci Resolve Recording clips with your video assist is only part of the process of creating film and television content, and just as important is the process of media backup and management as well as editing, color correction and encoding final master files.
To create a new project, click on ‘new project’ at the bottom of the window and give your project a name. Click ‘create’. Using the ‘cut’ page, you can start working on your edit immediately. The project manager shows all projects belonging to the current user For more information about the Project Manager, refer to the DaVinci Resolve manual which is available to download on the Blackmagic Design website support page.
For more information on the Cut page, see the ‘Using the Cut Page’ chapter in the DaVinci Resolve manual. Media Tabs At the top left corner of the user interface you will see five tabs. Click on these tabs to open the media toolsets you will use when creating your edit. For example, the first tab is the media pool and you can see it is already selected. The other tabs are for the sync bin, media transitions, titles and effects.
Source Clip The source clip viewer displays a single clip from the media pool and you can set in and out points along the entire length of the viewer timeline. This gives you greater control. Select a source clip to view by double clicking on a clip in the media pool, or dragging it into the viewer. Source Tape Source tape lets you view all the source clips in the media pool. This powerful feature is helpful if you want to quickly search through all your clips to find a specific event.
Adding Clips to the Timeline Now that you are familiar with the media tabs and viewer mode buttons, you can open the media pool and quickly start adding clips to your timeline. The timeline of the cut page, comprising the upper timeline and the zoomed in timeline below The timeline is where you will build your edit and is like a board with tracks you can attach clips to, move them around and trim their edits.
3 Now click the ‘append’ icon underneath the media pool. Your first clip will be placed at the head of the timeline. Repeat steps 1 to 3 to keep adding more clips and they will automatically append, ensuring there are no gaps in the timeline. Appending clips ensures there are no gaps between them on the timeline TIP You can speed up the process further by assigning a keyboard shortcut to the ‘append’ icon.
A good example is to add a standard title. To do this: 1 Click on the ‘text’ title and drag it onto the timeline. It doesn’t matter which timeline, but for greater accuracy we recommend using the detailed timeline. The title will automatically create a new video track for the title and will snap to the playhead. 2 Release the mouse and the title will appear on the new track. You can now move it or change its duration like you would another video clip.
For Blackmagic RAW files from 12G video assist models, you have the flexibility to use the camera’s original gamut and gamma, or treat them as you would other .braw files using the Blackmagic Design color space and a Blackmagic gamma, such as Blackmagic Design Film. Using the default camera settings With your clip selected on the ‘color’ page, go to the ‘camera raw’ tab in the lower left corner. You will notice on the left hand side that the color space and gamma settings match your camera settings.
Exposure Use this setting to refine the overall brightness of the image. Saturation Saturation controls default at 1 and range from -1 for the minimum saturation to +4 for maximum saturation. Contrast Defaulting at 1.0, drag the slider to the left for the least amount of contrast at 0 or to the right to increase the contrast up to 2. Midpoint In Blackmagic Design Film, your middle gray value defaults to 0.38, or 38.4%. Drag the slider to the left to lower your midpoint or to the right to raise it to 100.
TIP Gamma controls are disabled for footage shot with the ‘video’ dynamic range, but you have not lost your Blackmagic RAW data. Simply select Blackmagic Design Film or Blackmagic Design Extended Video from the dropdown gamma menu and make your adjustments. Saving your Blackmagic RAW changes 1 Adjust the gamma controls for your Blackmagic RAW clip. 2 Click the ‘update sidecar’ button. A ‘sidecar’ file will now be created in the same folder as your .braw file.
The color page lets you adjust the look of your edit and in many ways color correction is an art form in itself. You are really adding emotion to your work when you add color correction. It’s an incredibly creative part of the workflow and very satisfying when you learn these skills and can see your work come alive! This is usually the first step and is referred to as primary color correction, or adjusting the primaries.
The ‘lift, ‘gamma’, ‘gain’ and ‘offset’ color wheels give you total control over the color and tonal balance of your clips. To make a uniform adjustment to all colors for each tonal region, drag the dial underneath the color wheels back and forth For more accurate control of each color using a mouse, you can change the color wheels to ‘primaries bars’ which let you adjust each color and luminance channel for the lift, gamma and gain controls separately.
The curves palette is another tool you can use to make primary color corrections, or enhance specific areas of your clip when using a power window Secondary Color Correction If you want to adjust a specific part of your image then you need to use secondary corrections. The adjustments you have been doing up until now using the lift, gamma and gain adjustments affect the whole image at the same time and so they are called primary color corrections.
Experiment with the high, low and softness controls to see how to refine your selection. Now you can make corrections to your selected color using the color wheels or custom curves. Sometimes your selection can spill into areas of the shot you don’t want to affect. You can easily mask out the unwanted areas using a power window. Simply create a new window and shape it to select only the area of color you want.
Tracking a Window The camera, object or area in your shot may be moving, so to make sure your window stays on your selected object or area, you can use DaVinci Resolve’s powerful tracking feature. The tracker analyzes the pan, tilt, zoom and rotation of the camera or object in your clip so you can match your windows to that movement. If this isn’t done, your correction can move off the selected target and call attention to itself, which you probably don’t want.
In the ‘edit’ page you can add plugin filters, generators and transitions to clips by opening the ‘OpenFX’ panel in the ‘effects library’ and dragging your selected plugin onto the video clip or track above your clip on the timeline depending on the plugin requirements. OFX plugins are a quick and easy way to create an imaginative and interesting look Mixing Your Audio Mixing Audio in the Edit Page Once you have edited and color corrected your project, you can begin to mix your audio.
Dragging a volume overlay to adjust the clip level For projects requiring more advanced audio tools, the Fairlight page provides you with a full audio post production environment. The Fairlight Page The ‘Fairlight’ page in DaVinci Resolve is where you adjust your project audio.
The track header on track A1 indicates a mono track with a single lane for mono audio, and the A2 track header indicates a stereo track with two lanes to accommodate stereo audio What is a Bus? A bus is essentially a destination channel to which you can route multiple audio tracks from the timeline, so that they are mixed together into a single signal that can be controlled via a single channel strip.
Using the Equalizer to Enhance your Audio After adjusting the audio levels of your audio clips in your project, you may find that the audio needs further finessing. In some cases you may find that the dialogue, music and sound effects are competing for the same frequency on the audio spectrum, making your audio too busy and unclear. This is where using EQ can help, as it allows you to specify the parts of the audio spectrum that each track occupies.
To add EQ to an individual clip: 1 Select the clip in the timeline that you want to add the EQ filter to. 2 Click on the inspector and then click the ‘clip equalizer’ enable button. To add EQ to a track: 1 Double click in the EQ section for one of your tracks in the mixer to open the equalizer for that track. 2 Select the band filter type from the dropdown menu for the band you want to adjust.
Adding VFX and Compositing on the Fusion Page Now that you have completed your edit, you can open the Fusion page to add 2D or 3D visual effects and motion graphics right within DaVinci Resolve. Unlike layer based compositing software, Fusion uses nodes, giving you the freedom to build complex effects while routing image data in any direction. The nodes window clearly shows every tool used along the way. If you have experienced the node workflow in the color page, this will feel familiar to you.
Create a new version of your composition by right clicking on a thumbnail and selecting ‘create new composition’. Viewers: The viewers are always visible and let you see the different views of your composition, for example an overall 3D perspective via the merge 3D node, a camera output, or your final render output. These viewers also let you see how your changes are affecting a specific element.
Spline: When the spline editor is open, it will appear to the right of the nodes window. This editor lets you make precise adjustments to each node, such as smoothing the animation between two keyframes using bezier curves. Keyframes: Keyframes for each tool can be added, removed or modified using the keyframes editor. This also appears to the right of the nodes viewer. Metadata: The metadata window will show you metadata available for the active clip, including the codec, frame rate and timecode.
foreground input background input effect mask input output Multiple outputs on nodes means a single node can connect to many different nodes in your composition, so you don’t have to duplicate clips as you would in layer based software. Arrows on the line between connected nodes are a great visual indicator to show you which direction the image data is flowing. Adding Nodes to the Node Editor Adding effects is as simple as placing nodes on the line between the ‘mediain’ and ‘mediaout’ nodes.
Selected nodes appear with a red border. Here the inspector panel is displaying the layout tab controls for the text node. There are different parameters and settings you can adjust for every node depending on its task, from sizing and center positions to changing the number of particles in an emitter node. Setting keyframes and changing the settings over time will animate the effect.
Using the Motion Tracker and Adding Text To get a better idea of how to use Fusion, we have included the following examples to show how to use the tracker tool to track an element in a clip, plus add text and attach it to the element using the tracking data. The ‘tracker’ tool tracks pixels over time on the x & y axis, and generates data you can use to attach other elements.
5 Click on the ‘tracker’ node and type ‘1’ so you can see the merged results on your left hand viewer. In the ‘tracker’ inspector panel, click on the ‘operations’ tab. You can see the tab’s name by hovering the mouse pointer over it. Click the dropdown menu next to operation and select ‘match move’. 6 Click the ‘text’ node to reveal the properties in the inspector. Type your text into the text box and change the font, color and size to suit your composition.
7 Click on the keyframes tab above the inspector to open the keyframes editor. Any nodes with keyframes applied will have a small arrow next to the node label, and only the parameter with keyframes added will appear in the list below. Click on the magnify icon and drag a box around the area you want to edit. This will zoom into that area so you can see the keyframes easier. 8 Move the playhead to the location of the last keyframe you want.
Mastering Your Edit Now you’ve edited, graded, added vfx and mixed your audio, you’ll want to share it with others. You can use the Quick Export button, or menu selection, to output the contents of the Timeline as a self contained file in one of a variety of different formats, or use the additional features of the ‘deliver’ page. The ‘deliver’ page is where you export your edit.
The Deliver Page This page lets you select the range of clips you want to export, plus the format, codec and resolution you want. You can export in many types of formats such as QuickTime, AVI, MXF and DPX using codecs such as 8-bit or 10-bit uncompressed RGB/YUV, ProRes, DNxHD, H.264 and more. To export a single clip of your edit: 1 Click on the ‘deliver’ tab to open the deliver page. 2 Go to the ‘render settings’ window on the top left of the page.
Using Final Cut Pro X To edit your clips using Final Cut Pro X, you need to create a new project and set a suitable video format and frame rate. This example uses ProRes 422 HQ 1080p24. Final Cut Pro X project settings 1 Launch Final Cut Pro X, go to the ‘menu’ bar and select ‘file/new project’. A window will open containing project settings. 2 Name your project and select the ‘custom’ checkbox. 3 Set the ‘video properties’ settings to 1080p HD, 1920x1080 and 24p.
1 Launch Avid Media Composer 2018 and the ‘select project’ window will appear. 2 Click the ‘new project’ button and name your project in the ‘new project’ window. 3 In the ‘format’ drop down menu select HD 1080 > 1080p/24 and click ‘ok’ to create the project. 4 Double click the project in the ‘select project’ window to open it. 5 Select file > input > source browser and navigate to the files you wish to import. 6 Select your ‘target bin’ from the drop down menu and click ‘import’.
Help Getting Help The fastest way to obtain help is to go to the Blackmagic Design online support pages and check the latest support material available for your video assist. Blackmagic Design Online Support Pages The latest manual, software and support notes can be found at the Blackmagic Design support center at www.blackmagicdesign.com/support. Blackmagic Design Forum The Blackmagic Design forum on our website is a helpful resource you can visit for more information and creative ideas.
Regulatory Notices Disposal of Waste of Electrical and Electronic Equipment Within the European Union. The symbol on the product indicates that this equipment must not be disposed of with other waste materials. In order to dispose of your waste equipment, it must be handed over to a designated collection point for recycling.
Safety Information Product is suitable for use in tropical locations with an ambient temperature of up to 40oC. Ensure that adequate ventilation is provided around the product and that it is not restricted. No operator serviceable parts inside product. Refer servicing to your local Blackmagic Design service center. During sunny conditions, consider shading of the unit to prevent exposure of the lithium battery to extended periods of sunlight. Keep lithium batteries away from all sources of heat.
Warranty 12 Month Limited Warranty Blackmagic Design warrants that this product will be free from defects in materials and workmanship for a period of 12 months from the date of purchase. If a product proves to be defective during this warranty period, Blackmagic Design, at its option, either will repair the defective product without charge for parts and labor, or will provide a replacement in exchange for the defective product.