
User's Manual
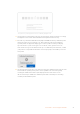
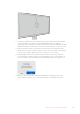
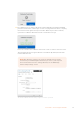
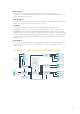
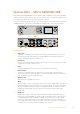

Table Of Contents
- Getting Started
- Installing Administration Software
- Changing Settings
- Changing Network Settings
- Teranex Mini Rack Shelf
- Teranex Mini Models
- Teranex Mini – SDI to DisplayPort 8K HDR
- Teranex Mini – SDI to HDMI 8K HDR
- Teranex Mini – IP Video 12G
- Teranex Mini – SDI to HDMI 12G
- Teranex Mini – HDMI to SDI 12G
- Teranex Mini – SDI to Analog 12G
- Teranex Mini – Analog to SDI 12G
- Teranex Mini – SDI to Audio 12G
- Teranex Mini – Audio to SDI 12G
- Teranex Mini – 12G–SDI to Quad SDI
- Teranex Mini – Quad SDI to 12G-SDI
- Teranex Mini – SDI Distribution 12G
- Teranex Mini – Optical to HDMI 12G
- Teranex Mini – HDMI to Optical 12G
- Teranex Mini – Optical to Analog 12G
- Teranex Mini – Analog to Optical 12G
- Teranex Mini – Optical to Audio 12G
- Teranex Mini – Audio to Optical 12G
- Help
- Regulatory Notices
- Safety Information
- Warranty
- English
- 日本語
- Français
- Deutsch
- Español
- 中文
- 한국어
- Русский
- Italiano
- Português
- Türkçe
- はじめに
- 管理ソフトウェアのインストール
- 設定の変更
- ネットワーク設定の変更
- Teranex Mini Rack Shelf
- Teranex Miniモデル
- Teranex Mini – SDI to DisplayPort 8K HDR
- Teranex Mini – SDI to HDMI 8K HDR
- Teranex Mini – IP Video 12G
- Teranex Mini - SDI to HDMI 12G
- Teranex Mini - HDMI to SDI 12G
- Teranex Mini - SDI to Analog 12G
- Teranex Mini - Analog to SDI 12G
- Teranex Mini - SDI to Audio 12G
- Teranex Mini - Audio to SDI 12G
- Teranex Mini - 12G-SDI to Quad SDI
- Teranex Mini - Quad SDI to 12G-SDI
- Teranex Mini - SDI Distribution 12G
- Teranex Mini - Optical to HDMI 12G
- Teranex Mini - HDMI to Optical 12G
- Teranex Mini - Optical to Analog 12G
- Teranex Mini - Analog to Optical 12G
- Teranex Mini - Optical to Audio 12G
- Teranex Mini - Audio to Optical 12G
- ヘルプ
- 規制に関する警告
- 安全情報
- 保証
- Mise en route
- Installer le logiciel d'administration
- Modifier les paramètres
- Modifier les paramètres réseau
- Teranex Mini Rack Shelf
- Les modèles Teranex Mini
- Teranex Mini - SDI to DisplayPort 8K HDR
- Teranex Mini – SDI to HDMI 8K HDR
- Teranex Mini - IP Video 12G
- Teranex Mini - SDI to HDMI 12G
- Teranex Mini - HDMI to SDI 12G
- Teranex Mini - SDI to Analog 12G
- Teranex Mini - Analog to SDI 12G
- Teranex Mini - SDI to Audio 12G
- Teranex Mini - Audio to SDI 12G
- Teranex Mini - 12G-SDI to Quad SDI
- Teranex Mini - Quad SDI to 12G-SDI
- Teranex Mini - SDI Distribution 12G
- Teranex Mini - Optical to HDMI 12G
- Teranex Mini - HDMI to Optical 12G
- Teranex Mini - Optical to Analog 12G
- Teranex Mini - Analog to Optical 12G
- Teranex Mini - Optical to Audio 12G
- Teranex Mini - Audio to Optical 12G
- Assistance
- Avis règlementaires
- Informations de sécurité
- Garantie
- Erste Schritte
- Installation der Verwaltungssoftware
- Einstellungen ändern
- Netzwerkeinstellungen ändern
- Teranex Mini Rackwanne
- Die Teranex Mini Modelle
- Teranex Mini – SDI to DisplayPort 8K HDR
- Teranex Mini – SDI to HDMI 8K HDR
- Teranex Mini – IP Video 12G
- Teranex Mini – SDI to HDMI 12G
- Teranex Mini – HDMI to SDI 12G
- Teranex Mini – SDI to Analog 12G
- Teranex Mini Analog to SDI 12G
- Teranex Mini – SDI to Audio 12G
- Teranex Mini – Audio to SDI 12G
- Teranex Mini – 12G-SDI to Quad SDI
- Teranex Mini – Quad SDI to 12G-SDI
- Teranex Mini – SDI Distribution 12G
- Teranex Mini – Optical to HDMI 12G
- Teranex Mini – HDMI to Optical 12G
- Teranex Mini – Optical to Analog 12G
- Teranex Mini – Analog to Optical 12G
- Teranex Mini – Optical to Audio 12G
- Teranex Mini – Audio to Optical 12G
- Hilfe
- Gesetzliche Vorschriften
- Sicherheitshinweise
- Garantie
- Primeros pasos
- Instalación del programa utilitario
- Modificación de ajustes
- Modificación de los ajustes de red
- Estante para bastidores
- Modelos Teranex Mini
- Teranex Mini SDI to DisplayPort 8K HDR
- Teranex Mini SDI to HDMI 8K HDR
- Teranex Mini IP Video 12G
- Teranex Mini SDI to HDMI 12G
- Teranex Mini HDMI to SDI 12G
- Teranex Mini SDI to Analog 12G
- Teranex Mini Analog to SDI 12G
- Teranex Mini SDI to Audio 12G
- Teranex Mini Audio to SDI 12G
- Teranex Mini 12G-SDI to Quad SDI
- Teranex Mini Quad SDI to 12G-SDI
- Teranex Mini SDI Distribution 12G
- Teranex Mini Optical to HDMI 12G
- Teranex Mini HDMI to Optical 12G
- Teranex Mini Optical to Analog 12G
- Teranex Mini Analog to Optical 12G
- Teranex Mini Optical to Audio 12G
- Teranex Mini Audio to Optical 12G
- Ayuda
- Normativas
- Seguridad
- Garantía
- 入门
- 安装管理软件
- 更改设置
- 更改网络设置
- Teranex Mini Rack Shelf
- Teranex Mini型号介绍
- Teranex Mini – SDI to DisplayPort 8K HDR
- Teranex Mini – SDI to HDMI 8K HDR
- Teranex Mini – IP Video 12G
- Teranex Mini - SDI to HDMI 12G
- Teranex Mini - HDMI to SDI 12G
- Teranex Mini - SDI to Analog 12G
- Teranex Mini - Analog to SDI 12G
- Teranex Mini - SDI to Audio 12G
- Teranex Mini - Audio to SDI 12G
- Teranex Mini - 12G-SDI to Quad SDI
- Teranex Mini - Quad SDI to 12G-SDI
- Teranex Mini - SDI Distribution 12G
- Teranex Mini - Optical to HDMI 12G
- Teranex Mini - HDMI to Optical 12G
- Teranex Mini - Optical to Analog 12G
- Teranex Mini - Analog to Optical 12G
- Teranex Mini - Optical to Audio 12G
- Teranex Mini - Audio to Optical 12G
- 帮助
- 监管声明
- 安全信息
- 保修
- 시작하기
- 관리용 소프트웨어 설치하기
- 설정 변경하기
- 네트워크 설정 변경하기
- Teranex Mini Rack Shelf
- Teranex Mini 모델
- Teranex Mini SDI to DisplayPort 8K HDR
- Teranex Mini - SDI to HDMI 8K HDR
- Teranex Mini IP Video 12G
- Teranex Mini - SDI to HDMI 12G
- Teranex Mini - HDMI to SDI 12G
- Teranex Mini – SDI to Analog 12G
- Teranex Mini – Analog to SDI 12G
- Teranex Mini – SDI to Audio 12G
- Teranex Mini – Audio to SDI 12G
- Teranex Mini – 12G-SDI to Quad SDI
- Teranex Mini – Quad SDI to 12G-SDI
- Teranex Mini – SDI Distribution 12G
- Teranex Mini – Optical to HDMI 12G
- Teranex Mini – HDMI to Optical 12G
- Teranex Mini – Optical to Analog 12G
- Teranex Mini – Analog to Optical 12G
- Teranex Mini – Optical to Audio 12G
- Teranex Mini – Audio to Optical 12G
- 도움말
- 규제 사항
- 안전 정보
- 보증
- Подготовка к работе
- Установка программного обеспечения
- Изменение настроек
- Изменение сетевых настроек
- Teranex Mini Rack Shelf
- Модели Teranex Mini
- Teranex Mini – SDI to DisplayPort 8K HDR
- Teranex Mini – SDI to HDMI 8K HDR
- Teranex Mini – IP Video 12G
- Teranex Mini – SDI to HDMI 12G
- Teranex Mini – HDMI to SDI 12G
- Teranex Mini – SDI to Analog 12G
- Teranex Mini – Analog to SDI 12G
- Teranex Mini – SDI to Audio 12G
- Teranex Mini – Audio to SDI 12G
- Teranex Mini – 12G-SDI to Quad SDI
- Teranex Mini – Quad SDI to 12G-SDI
- Teranex Mini – SDI Distribution 12G
- Teranex Mini – Optical to HDMI 12G
- Teranex Mini – HDMI to Optical 12G
- Teranex Mini – Optical to Analog 12G
- Teranex Mini – Analog to Optical 12G
- Teranex Mini – Optical to Audio 12G
- Teranex Mini – Audio to Optical 12G
- Помощь
- Соблюдение нормативных требований
- Правила безопасности
- Гарантия
- Operazioni preliminari
- Installare il software di amministrazione
- Cambiare le impostazioni
- Cambiare le impostazioni di rete
- Teranex Mini Rack Shelf
- I modelli Teranex Mini
- Teranex Mini – SDI to DisplayPort 8K HDR
- Teranex Mini - SDI to HDMI 8K HDR
- Teranex Mini - IP Video 12G
- Teranex Mini – SDI to HDMI 12G
- Teranex Mini HDMI to SDI 12G
- Teranex Mini – SDI to Analog 12G
- Teranex Mini – Analog to SDI 12G
- Teranex Mini – SDI to Audio 12G
- Teranex Mini – Audio to SDI 12G
- Teranex Mini - 12G-SDI to Quad SDI
- Teranex Mini - Quad SDI to 12G-SDI
- Teranex Mini - SDI Distribution 12G
- Teranex Mini – Optical to HDMI 12G
- Teranex Mini – HDMI to Optical 12G
- Teranex Mini - Optical to Analog 12G
- Teranex Mini - Analog to Optical 12G
- Teranex Mini - Optical to Audio 12G
- Teranex Mini - Audio to Optical 12G
- Approfondimento e domande frequenti
- Normative
- Sicurezza
- Garanzia
- Instruções Preliminares
- Instalando o Software de Administração
- Alterando Configurações
- Alterando Configurações de Rede
- Teranex Mini Rack Shelf
- Modelos Teranex Mini
- Teranex Mini – SDI to DisplayPort 8K HDR
- Teranex Mini – SDI to HDMI 8K HDR
- Teranex Mini – IP Video 12G
- Teranex Mini – SDI to HDMI 12G
- Teranex Mini – HDMI to SDI 12G
- Teranex Mini – SDI to Analog 12G
- Teranex Mini – Analog to SDI 12G
- Teranex Mini – SDI to Audio 12G
- Teranex Mini – Audio to SDI 12G
- Teranex Mini – 12G–SDI to Quad SDI
- Teranex Mini – Quad SDI to 12G-SDI
- Teranex Mini – SDI Distribution 12G
- Teranex Mini – Optical to HDMI 12G
- Teranex Mini – HDMI to Optical 12G
- Teranex Mini – Optical to Analog 12G
- Teranex Mini – Analog to Optical 12G
- Teranex Mini – Optical to Audio 12G
- Teranex Mini – Audio to Optical 12G
- Ajuda
- Informações Regulatórias
- Informações de Segurança
- Garantia
- Başlarken
- Yönetim Yazılımının Yüklenmesi
- Ayarların Değiştirilmesi
- Ağ Ayarlarının Değiştirilmesi
- Teranex Mini Rack Shelf
- Teranex Mini Modelleri
- Teranex Mini – SDI to DisplayPort 8K HDR
- Teranex Mini – SDI to HDMI 8K HDR
- Teranex Mini – IP Video 12G
- Teranex Mini – SDI to HDMI 12G
- Teranex Mini – HDMI to SDI 12G
- Teranex Mini – SDI to Analog 12G
- Teranex Mini – Analog to SDI 12G
- Teranex Mini – SDI to Audio 12G
- Teranex Mini – Audio to SDI 12G
- Teranex Mini – 12G–SDI to Quad SDI
- Teranex Mini – Quad SDI to 12G-SDI
- Teranex Mini – SDI Distribution 12G
- Teranex Mini – Optical to HDMI 12G
- Teranex Mini – HDMI to Optical 12G
- Teranex Mini – Optical to Analog 12G
- Teranex Mini – Analog to Optical 12G
- Teranex Mini – Optical to Audio 12G
- Teranex Mini – Audio to Optical 12G
- Yardım
- Mevzuata İlişkin Bildirimler
- Güvenlik Bilgileri
- Garanti

Test pattern on your DisplayPort monitor for calibrating highlight detail.
3.8 It’s important to note that these two steps are repeated to verify your monitor’s settings
for brightness and contrast and make further fine adjustments if necessary.
3.9 The LCD on your Teranex Mini SDI to DisplayPort 8K HDR should say ‘calibration probe
detected’. Select ‘choose’ and press ‘set’. The LCD shows a list of preconfigured
spectral profiles of supported display types. Select a profile to match your display.
If you are unsure or your screen type is not on the list, select ‘generic’. Press ‘set’.
If the status message on the Teranex LCD says ‘no calibration probe detected’, confirm
your probe is a compatible model and is connected properly to the USB-C port on the
front panel.
3.10 If your probe has a protective cover, remove it. Place the calibration probe in front of the
monitor with the opening of the probe’s sensor parallel to the screen and gently
touching the middle of the white square displayed in the center of the screen.
We recommend you stabilize the calibration probe with a small tripod or mounting
method provided with the probe.
HD_contrast_graphic gamma 0.5_UI
LCD Calibration Probe Detected_UI
21Teranex Mini – SDI to DisplayPort 8K HDR