
User's Manual


Recording Clean HDMI from DSLR Cameras
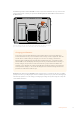
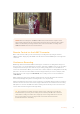
Some DSLR cameras record 8-bit video internally, and some can provide a clean video image
via their HDMI output. By plugging the DSLR camera’s HDMI output into your video assist, you
can bypass the camera’s internal compression and record using high quality 10-bit ProRes or
Avid DNx codecs. Some DSLR cameras can output 10-bit 4:2:2, which is higher quality video
than their internally recorded 8-bit 4:2:0 compression.
Many DSLR cameras are also limited to short recording durations, so an added benefit of
recording externally is bypassing these recording limitations. This is particularly helpful when
recording live events or interviews for documentaries.
To make the most of this feature, you will need to set your camera to output a clean image with
overlays turned off. This is normally done by changing your DSLR camera’s HDMI output
settings so it does not show any status information in the video signal. This is important
because if there are any overlays visible in your image via the HDMI output they will be
recorded in your video, which you probably don’t want.
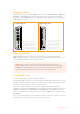
To check the DSLR camera overlays are not visible:
1 Swipe the touchscreen up or down to hide the on screen meters so you can monitor
only your DSLR camera’s image. On 7” video assist models the upper toolbar at the top
of the LCD is independent and separate from the image. This means you can monitor
the entire image cleanly and still have the upper toolbar visible.
2 With the on screen meters hidden, carefully check the DSLR camera’s output video
does not show any information other than your clean video image. If you can see
camera overlays on your video assist’s LCD, change the HDMI output or display menu
settings on your camera so HDMI overlays are turned off.
With a clean HDMI output from your camera you can now record better quality video!
Playback
The transport controls can be found on the lower toolbar. If your lower toolbar is hidden from
view, simply swipe the screen up or down to reveal it.
Play
To play your clips, tap the ‘play’ icon.
Stop
During playback, tap the ‘stop or ‘pause’ icon to momentarily ‘freeze’
playback on a frame of video.
Skip
You can skip backwards or forwards through your clips by repeatedly
tapping the forward or reverse skip icons. Tapping reverse skip once will
restart the current clip.
Shuttle
Hold down one of the skip buttons to change into shuttle mode. Now you
can fast forward or rewind by tapping either shuttle button through speeds
from x1/2 to x50. Press the stop or play button to revert the buttons back to
skip mode.
10Playback