
User Manual
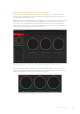
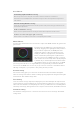


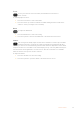
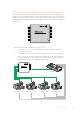
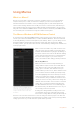
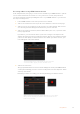
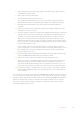
Table Of Contents
- Getting Started
- Switching your Production
- Additional Features on ISO Models
- ATEM SDI Extreme ISO
- ATEM Software Control
- Switching Modes
- Using ATEM Software Control
- Media Manager
- Audio Mixer
- Camera Control
- Using the Software Control Panel
- Transition Control and Upstream Keyer
- Downstream Keyers
- Processing Palettes
- Media Player Tab
- Output Tab
- Recording ISO Files
- Timecode Generator
- Using the Audio Mixer
- Shaping your Audio Mix using Advanced Fairlight Controls
- Using the 6 Band Parametric Equalizer
- Fairlight Controls Workflow Guide
- Using the Media Page
- Navigating the Browse Window
- ATEM Media Pool
- Image File Types
- Creating a TGA File with an Alpha Channel
- Camera Control
- Using Macros
- Changing Switcher Settings
- ATEM Setup Settings
- Using Adobe Photoshop with ATEM
- Using Multiple Control Panels
- Connecting to a Network
- Connecting to an Internet Router
- Keying using ATEM SDI
- Streaming Video
- HyperDeck Control
- ATEM 1 M/E Advanced Panel
- Using ATEM 1 M/E Advanced Panel
- ATEM Camera Control Panel
- Mixing Audio
- Help
- Regulatory Notices
- Safety Information
- Warranty

Recording a Macro using ATEM Software Control
In the example below, we’re going to create a macro that will set your ATEM switcher to perform
a 3 second mix transition from color bars to color 1, pause for 2 seconds, then perform a 3
second mix transition to black. Try building this macro on your ATEM switcher so you can learn
the steps in creating macros.
1 Launch ATEM Software Control and open the macros window.
2 Click on the create button at the top of the macros window to select the create page.
3 Click on a macro slot you want to record your macro to. In this example, click on macro
slot 1. An orange border will appear around the slot you have selected.
4 Click on the create macro button, which is labeled with a ‘plus’ icon, to open the create
macro popup window.
If you want to, you can enter the name of your macro and type a description. In this
example the new macro has been named ‘transitions’. This lets you easily keep track of
your macros and quickly see what each macro does. When you click on a macro, your
notes will appear in the status window.
To start recording a macro, select a macro slot, then click on the
createmacro button. Type in your notes and click ‘record’.
5 Click the ‘record’ button.
The popup window will close and a red border will appear around your ATEM Software
Control panel indicating your macro is now recording. Notice the red ‘add pause’ button
at the top of the border.
Now that your macro is recording, you can start performing your switcher actions.
While recording, the create macro button will change to a ‘record’ button.
When you have completed your switcher actions, click on the ‘record’
button to stop recording.
79Using Macros