
User Manual
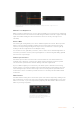
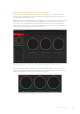
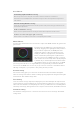


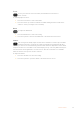
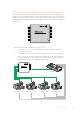
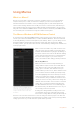
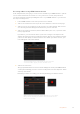
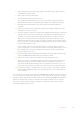
Table Of Contents
- Getting Started
- Switching your Production
- Additional Features on ISO Models
- ATEM SDI Extreme ISO
- ATEM Software Control
- Switching Modes
- Using ATEM Software Control
- Media Manager
- Audio Mixer
- Camera Control
- Using the Software Control Panel
- Transition Control and Upstream Keyer
- Downstream Keyers
- Processing Palettes
- Media Player Tab
- Output Tab
- Recording ISO Files
- Timecode Generator
- Using the Audio Mixer
- Shaping your Audio Mix using Advanced Fairlight Controls
- Using the 6 Band Parametric Equalizer
- Fairlight Controls Workflow Guide
- Using the Media Page
- Navigating the Browse Window
- ATEM Media Pool
- Image File Types
- Creating a TGA File with an Alpha Channel
- Camera Control
- Using Macros
- Changing Switcher Settings
- ATEM Setup Settings
- Using Adobe Photoshop with ATEM
- Using Multiple Control Panels
- Connecting to a Network
- Connecting to an Internet Router
- Keying using ATEM SDI
- Streaming Video
- HyperDeck Control
- ATEM 1 M/E Advanced Panel
- Using ATEM 1 M/E Advanced Panel
- ATEM Camera Control Panel
- Mixing Audio
- Help
- Regulatory Notices
- Safety Information
- Warranty

Camera Control using ATEM SDI Extreme ISO
ATEM SDI Extreme ISO allows you to control Blackmagic camera settings including iris, gain,
focus and shutter directly from the switcher’s control panel.
The camera control buttons are located above the audio options for each input. You can
adjust the camera settings in much the same way as the camera control panel in ATEM
Software Control.
Camera control buttons will illuminate green when selected
Iris
By default, the arrow buttons control iris when no other option is selected.
Toset auto exposure on, press both of the arrow buttons simultaneously.
This setting automatically adjusts the aperture to maintain a constant exposure while keeping
shutter angle consistent. This will keep motion blur unaffected, but mayaffect your depth
of field.
To manually adjust the iris:
1 Press the up arrow to increase the aperture.
2 Press the down arrow to decrease.
TIP The arrow buttons control iris unless another setting, for example gain or shutter,
is selected. The selected setting will time out 3 seconds from the last button press.
Gain
The camera gain setting allows you to turn on additional gain in the camera. This is
important when you are operating in low light conditions and need extra gain in the
front end of the camera to avoid your images being under exposed.
To adjust the gain:
1 Press the gain button to highlight the setting.
2 Press the up arrow to increase the gain or the down arrow to decrease.
It’s worth noting that adding gain will increase noise in your images.
1 2 3 4
5 6 7
RESETAFV
OFFON
RESETAFV
OFFON
RESETAFV
OFFON
RESETAFV
OFFON
RESET
AFV
OFF
ON
RESETAFV
OFFON
RESETAFV
OFFON
RESETAFV
OFFON
FOCUSGAIN
SHUTBLACK
FOCUSGAIN
SHUTBLACK
FOCUSGAIN
SHUTBLACK
FOCUSGAIN
SHUT
1
K1 LUM
2
K1 CHR
3
K1 PTN
4
K2 LUM
5
K2 CHR
6
K2 PTN
7
DSK 1
8
DSK 2
MP 1
DVE 1
MP2
DVE 2
COL 1
DIP
COL 2
WIPE
BARS
LOGO
BLACK
STING
BLACK
FOCUS
GAIN
SHUT
BLACK
FOCUSGAIN
SHUTBLACK
FOCUSGAIN
SHUTBLACK
FOCUSGAIN
SHUTBLACK
OFFON OFFON RESETMUTE
8
CUT AUTO
1.00.5
2.01.5 DIPMIX PGMM/V
87
PVWCLEAN
65
43
65
43
21OFFON 21
OFFOFF OFFSTOP
ONON ON AIRREC
FTB
MIC 1 MIC 2 HEADPHONE
SELEC T BUS
PICTUR E IN PICTURE
MACRO
DURATION EFFECT VIDEO OUT
KEY 1 DSK 1 RECORD STREAM
DISK
MP 1 S/SRC
MP 2 BLACK
ATEM SDI Extreme ISO
75Camera Control