
User Manual
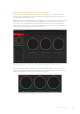
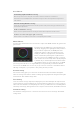


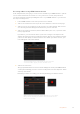
Table Of Contents
- Getting Started
- Switching your Production
- Additional Features on ISO Models
- ATEM SDI Extreme ISO
- ATEM Software Control
- Switching Modes
- Using ATEM Software Control
- Media Manager
- Audio Mixer
- Camera Control
- Using the Software Control Panel
- Transition Control and Upstream Keyer
- Downstream Keyers
- Processing Palettes
- Media Player Tab
- Output Tab
- Recording ISO Files
- Timecode Generator
- Using the Audio Mixer
- Shaping your Audio Mix using Advanced Fairlight Controls
- Using the 6 Band Parametric Equalizer
- Fairlight Controls Workflow Guide
- Using the Media Page
- Navigating the Browse Window
- ATEM Media Pool
- Image File Types
- Creating a TGA File with an Alpha Channel
- Camera Control
- Using Macros
- Changing Switcher Settings
- ATEM Setup Settings
- Using Adobe Photoshop with ATEM
- Using Multiple Control Panels
- Connecting to a Network
- Connecting to an Internet Router
- Keying using ATEM SDI
- Streaming Video
- HyperDeck Control
- ATEM 1 M/E Advanced Panel
- Using ATEM 1 M/E Advanced Panel
- ATEM Camera Control Panel
- Mixing Audio
- Help
- Regulatory Notices
- Safety Information
- Warranty

Click on the auto focus button or drag the manual focus adjustment left or right to focus a
compatible lens.
Manual Focus Adjustment
When you want to adjust the focus on your camera manually, you can use the focus adjustment
located at the bottom of each camera controller. Drag the wheel control left or right to manually
adjust focus while viewing the video feed from the camera to ensure your image is nice
and sharp.
Camera Gain
The camera gain setting allows you to turn on additional gain in the camera. This is important
when you are operating in low light conditions and need extra gain in the front end of the
camera to avoid your images being under exposed. You can decrease or increase gain by
clicking on the left or right arrows on the dB gain setting.
You can turn on some gain when you need it, such as outdoor shoots when the light fades at
sunset and you need to increase your image brightness. It’s worth noting that adding gain will
increase noise in your images.
Shutter Speed Control
The shutter speed control is located in the section between the color wheel and the iris/
pedestal control. Decrease or increase the shutter speed by hovering your mouse pointer
overthe shutter speed indicator and then clicking on the left or right arrows.
If you see flicker in lights you can decrease your shutter speed to eliminate it. Decreasing
shutter speed is a good way to brighten your images without using camera gain because you
are increasing the exposure time of the image sensor. Increasing shutter speed will reduce
motion blur so can be used when you want action shots to besharp and clean with minimal
motion blur.
White Balance
The white balance setting next to the shutter speed control can be adjusted by clicking on the
left or right arrows on each side of the color temperature indicator. Different light sources emit
warm or cool colors, so you can compensate by adjusting the white balance. This ensures the
whites in your image stay white.
Hovering your mouse pointer over the filter,
gain, shutter speed and white balance
indicators reveal arrows you can click on to
adjust their respective settings.
71Camera Control