
User Manual
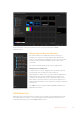
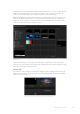
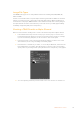
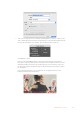
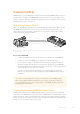
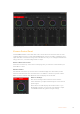
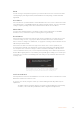
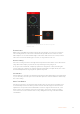
Table Of Contents
- Getting Started
- Switching your Production
- Additional Features on ISO Models
- ATEM SDI Extreme ISO
- ATEM Software Control
- Switching Modes
- Using ATEM Software Control
- Media Manager
- Audio Mixer
- Camera Control
- Using the Software Control Panel
- Transition Control and Upstream Keyer
- Downstream Keyers
- Processing Palettes
- Media Player Tab
- Output Tab
- Recording ISO Files
- Timecode Generator
- Using the Audio Mixer
- Shaping your Audio Mix using Advanced Fairlight Controls
- Using the 6 Band Parametric Equalizer
- Fairlight Controls Workflow Guide
- Using the Media Page
- Navigating the Browse Window
- ATEM Media Pool
- Image File Types
- Creating a TGA File with an Alpha Channel
- Camera Control
- Using Macros
- Changing Switcher Settings
- ATEM Setup Settings
- Using Adobe Photoshop with ATEM
- Using Multiple Control Panels
- Connecting to a Network
- Connecting to an Internet Router
- Keying using ATEM SDI
- Streaming Video
- HyperDeck Control
- ATEM 1 M/E Advanced Panel
- Using ATEM 1 M/E Advanced Panel
- ATEM Camera Control Panel
- Mixing Audio
- Help
- Regulatory Notices
- Safety Information
- Warranty

Detail
Use this setting to sharpen the image from your cameras live. Decrease or increase the level
of sharpening by selecting: Detail off, detail default for low sharpening, medium detail and
high detail.
Color Wheel
The color wheel is a powerful feature of the DaVinci Resolve color corrector and used to make
color adjustments to each YRGB channel’s lift, gamma and gain settings. Youcan select which
setting to adjust by clicking on the three selection buttons above the color wheel.
Master Wheel
Use the master wheel below the color wheel to make contrast adjustments to all YRGB
channels at once, or luminance only for each lift, gamma or gain setting.
Reset Buttons
The reset button near the bottom right of each camera controller lets you easily choose color
correction settings to reset, copy or paste. Each color wheel also has its own reset button.
Press to restore a setting to its default state, or copy/paste a setting. Locked controllers are not
affected by the Paste feature.
The master reset button on the bottom right corner of the color corrector panel lets you
reset lift, gamma and gain color wheels plus Contrast, Hue, Saturation and Lum Mix settings.
You can paste color correction settings to camera controllers individually, or all cameras at
once for a unified look. Iris, focus, coarse and pedestal settings are not affected by the Paste
feature. When applying Paste to all, a warning message will appear asking you to confirm your
action. This is so you don’t accidentally paste new settings to any unlocked cameras that are
currently on air.
When applying ‘paste to all’, a warning message will appear asking
you to confirm your action. This is so you don’t accidentally paste
new settings to any unlocked cameras that are currently on air.
Iris/Pedestal Control
The iris/pedestal control is located within the cross hairs of each camera controller. Thecontrol
illuminates red when its camera is on air.
To open or close the iris, drag the control up or down. Holding the shift key allows only iris
adjustments.
To darken or lift the pedestal, drag the control left or right. Holding the command key
on a Mac, or the Control key on Windows, allows only pedestal adjustments.
69Camera Control