
User Manual
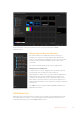
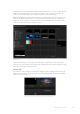
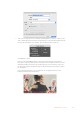
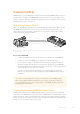
Table Of Contents
- Getting Started
- Switching your Production
- Additional Features on ISO Models
- ATEM SDI Extreme ISO
- ATEM Software Control
- Switching Modes
- Using ATEM Software Control
- Media Manager
- Audio Mixer
- Camera Control
- Using the Software Control Panel
- Transition Control and Upstream Keyer
- Downstream Keyers
- Processing Palettes
- Media Player Tab
- Output Tab
- Recording ISO Files
- Timecode Generator
- Using the Audio Mixer
- Shaping your Audio Mix using Advanced Fairlight Controls
- Using the 6 Band Parametric Equalizer
- Fairlight Controls Workflow Guide
- Using the Media Page
- Navigating the Browse Window
- ATEM Media Pool
- Image File Types
- Creating a TGA File with an Alpha Channel
- Camera Control
- Using Macros
- Changing Switcher Settings
- ATEM Setup Settings
- Using Adobe Photoshop with ATEM
- Using Multiple Control Panels
- Connecting to a Network
- Connecting to an Internet Router
- Keying using ATEM SDI
- Streaming Video
- HyperDeck Control
- ATEM 1 M/E Advanced Panel
- Using ATEM 1 M/E Advanced Panel
- ATEM Camera Control Panel
- Mixing Audio
- Help
- Regulatory Notices
- Safety Information
- Warranty

Image File Types
The ATEM media page can use many different file formats including TGA, PNG, BMP, GIF,
JPEG and TIFF.
Formats such as TGA include a separate alpha channel together with the RGB color channels.
This lets you embed a matte, or key image, inside that alpha channel. When a TGA image is
loaded in the media player, ATEM Software Control will automatically detect the key image in
the alpha channel and load it as the linear key source. This means your TGA graphic will key
beautifully straight away with perfect transparency.
Creating a TGA File with an Alpha Channel
Below is a demonstration showing how to create a title in Photoshop with an alpha channel.
1 Launch Adobe Photoshop and start a new project. Set the project to use the same
horizontal and vertical dimensions used in your broadcast video format. For example,
ifyou are broadcasting 1080p50, set the resolution to 1920 x 1080 pixels.
2 In the layers panel, create a new layer and build the graphic you want to use. In this
demonstration, we are using a ‘wedding’ lower thirds graphic.
3 Hold down the ‘command’ key on a Mac, or ‘control’ key for Windows, and click on the
layer thumbnail for your graphic. This will generate a selection of the color channels’
opacity values in your image. Their opacity determines the transparency of the graphic.
4 Go to the adjoining ‘channels’ panel and click on the ‘save selection as channel’ tool.
64ATEM Software Control