
User Manual
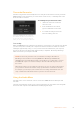

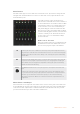
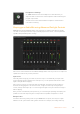
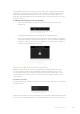
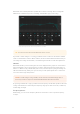
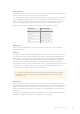
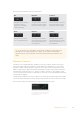
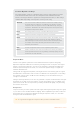
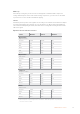
Table Of Contents
- Getting Started
- Switching your Production
- Additional Features on ISO Models
- ATEM SDI Extreme ISO
- ATEM Software Control
- Switching Modes
- Using ATEM Software Control
- Media Manager
- Audio Mixer
- Camera Control
- Using the Software Control Panel
- Transition Control and Upstream Keyer
- Downstream Keyers
- Processing Palettes
- Media Player Tab
- Output Tab
- Recording ISO Files
- Timecode Generator
- Using the Audio Mixer
- Shaping your Audio Mix using Advanced Fairlight Controls
- Using the 6 Band Parametric Equalizer
- Fairlight Controls Workflow Guide
- Using the Media Page
- Navigating the Browse Window
- ATEM Media Pool
- Image File Types
- Creating a TGA File with an Alpha Channel
- Camera Control
- Using Macros
- Changing Switcher Settings
- ATEM Setup Settings
- Using Adobe Photoshop with ATEM
- Using Multiple Control Panels
- Connecting to a Network
- Connecting to an Internet Router
- Keying using ATEM SDI
- Streaming Video
- HyperDeck Control
- ATEM 1 M/E Advanced Panel
- Using ATEM 1 M/E Advanced Panel
- ATEM Camera Control Panel
- Mixing Audio
- Help
- Regulatory Notices
- Safety Information
- Warranty

Range Presets
The frequency range for each band is defined by the range preset buttons. For example, low is
labeled ‘L’ and covers the frequency range from 30 to 395 Hz.
As a quick example of how the range presets define the frequency range, select a notch filter
from the band filter menu and then click on each range preset. You will see the filter effect
move to a position along the graph curve that corresponds to the range preset you choose.
This lets you quickly define aspecific range of frequencies you want the filter to affect.
Below is a table showing the range of frequencies for each range preset setting.
Range Preset Frequency Range
Low 30 Hz to 395 Hz
Mid Low 100 Hz to 1.48 kHz
Mid High 450 Hz to 7.91 kHz
High 1.4 kHz to 21.7 kHz
Gain Knobs
Click and drag the gain knob left or right to decrease or increase the volume level for the
selected frequency.
Q Factor
The Q factor control is available when the bell filter is applied to bands 2, 3, 4 and 5. This sets
the range of frequencies the filter will affect. For example, setting the minimum will allow the
filter to affect a wide range of surrounding frequencies and the maximum setting will narrow
theeffect down to a tiny point. This is important if you have sound qualities in surrounding
frequencies that you want to either include or exclude from the change you are making.
As you adjust the Q factor, watch the shape of the effect on the line curve change from a broad,
rounded edge to a sharp point. This is a visual representation showing how the regions of
frequencies surrounding the target frequency are affected.
TIP Compare the audio with changes against the original unaltered audio by clicking
on the bypass button at the very top of the equalizer window. This lets you turn the
equalizer on or off.
Band Filters
There are six different types of band filters you can choose from. These filters include bell,
high shelf, low shelf, notch, high pass, and low pass. These filters let you control specific zones
within the frequency range. For example, a low shelf filter lets you increase or decrease the
level of volume for lower frequencies on the graph, and a high shelf filter controls the higher
frequencies.
Try setting a low shelf filter to band 3 and make changes to the gain setting. You will see the
changes are weighted towards the low end frequencies on the graph.
57ATEM Software Control