
User Manual
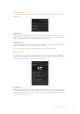
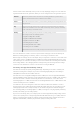
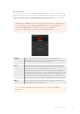
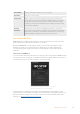
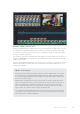
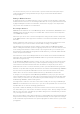
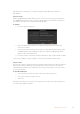
Table Of Contents
- Getting Started
- Switching your Production
- Additional Features on ISO Models
- ATEM SDI Extreme ISO
- ATEM Software Control
- Switching Modes
- Using ATEM Software Control
- Media Manager
- Audio Mixer
- Camera Control
- Using the Software Control Panel
- Transition Control and Upstream Keyer
- Downstream Keyers
- Processing Palettes
- Media Player Tab
- Output Tab
- Recording ISO Files
- Timecode Generator
- Using the Audio Mixer
- Shaping your Audio Mix using Advanced Fairlight Controls
- Using the 6 Band Parametric Equalizer
- Fairlight Controls Workflow Guide
- Using the Media Page
- Navigating the Browse Window
- ATEM Media Pool
- Image File Types
- Creating a TGA File with an Alpha Channel
- Camera Control
- Using Macros
- Changing Switcher Settings
- ATEM Setup Settings
- Using Adobe Photoshop with ATEM
- Using Multiple Control Panels
- Connecting to a Network
- Connecting to an Internet Router
- Keying using ATEM SDI
- Streaming Video
- HyperDeck Control
- ATEM 1 M/E Advanced Panel
- Using ATEM 1 M/E Advanced Panel
- ATEM Camera Control Panel
- Mixing Audio
- Help
- Regulatory Notices
- Safety Information
- Warranty

The live stream status will clearly show you are on air by displaying a large red ‘on air’ indicator
together with the timecode generator, which you can set using the timecode generator options.
Platform Click in the ‘platform’ menu and select the streaming platform for your broadcast.
Options include Facebook Live, YouTube Live and Twitch.
Server Select the server that is closest to your location by clicking in the settings window and
using the menu.
Key Enter the stream key that has been assigned to your broadcast from the streaming
platform. For information on how to obtain a stream key, refer to ‘getting a stream key’
in the ‘connecting to a network’ section.
Quality Select the streaming quality and stream recording quality you want.
This setting contains the following options:
HyperDeck High 45 to 70 Mb/s
HyperDeck Medium 25 to 45 Mb/s
HyperDeck Low 12 to 20 Mb/s
Streaming High 6 to 9 Mb/s
Streaming Medium 4.5 to 7 Mb/s
Streaming Low 3 to 4.5 Mb/s
More information about the quality settings is included in this section of the manual.
For more information on how to use these options when setting up a live stream directly via
Ethernet, including getting a stream key, refer to ‘connecting to an internet router.’
Even though the settings are nice and simple and you only need to select the service and a few
other options, there is an XML file that has additional settings that knowledgeable users could
take advantage of to add other streaming services and customize the streaming menu with low
level settings. Refer to the ‘changing switcher settings/saving and restoring switcher settings’
section for more information on how to save and restore using an XML file.
Streaming and HyperDeck Quality Settings
The data rate used by the quality setting will change depending on the video standard your
switcher is running at. For example, if you select Streaming High quality and are running at
1080p24 then it would use the 6 Mb/s data rate.
The data rates used on HyperDeck High are 45 to 70 Mb/s, the rates for HyperDeck Medium
are 25 to 45 Mb/s and the data rates used for HyperDeck Low are 12 to 20 Mb/s. The streaming
data rates are lower to allow for transmitting the data over the internet, so the data rate for
Streaming High is 6 to 9 Mb/s, the data rate for Streaming Medium is 4.5 to 7 Mb/s and the data
rate for Streaming Low is 3 to 4.5 Mb/s.
You will notice that each setting has 2 data rates mentioned. The lower number is used for
the lower frame rates of 24p, 25p and 30p, while the higher data rates are used when you are
running higher frame rates of 50p and 60p. It’s also worth noting that the default setting for
the streaming quality is Streaming High 6 to 9 Mb/s, as this gives a very high quality streaming
channel, and a fairly good recording quality.
If you are not streaming, then you could just pick one of the HyperDeck quality settings. These
are the same quality as the settings in HyperDeck Studio Mini and are a good quality data rate
when you need broadcast quality recordings. However, with the latest software released for
HyperDeck Studio Mini, it will also play the lower quality streaming data rates.
42ATEM Software Control