
User Manual

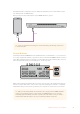
Table Of Contents
- Getting Started
- Switching your Production
- Additional Features on ISO Models
- ATEM SDI Extreme ISO
- ATEM Software Control
- Switching Modes
- Using ATEM Software Control
- Media Manager
- Audio Mixer
- Camera Control
- Using the Software Control Panel
- Transition Control and Upstream Keyer
- Downstream Keyers
- Processing Palettes
- Media Player Tab
- Output Tab
- Recording ISO Files
- Timecode Generator
- Using the Audio Mixer
- Shaping your Audio Mix using Advanced Fairlight Controls
- Using the 6 Band Parametric Equalizer
- Fairlight Controls Workflow Guide
- Using the Media Page
- Navigating the Browse Window
- ATEM Media Pool
- Image File Types
- Creating a TGA File with an Alpha Channel
- Camera Control
- Using Macros
- Changing Switcher Settings
- ATEM Setup Settings
- Using Adobe Photoshop with ATEM
- Using Multiple Control Panels
- Connecting to a Network
- Connecting to an Internet Router
- Keying using ATEM SDI
- Streaming Video
- HyperDeck Control
- ATEM 1 M/E Advanced Panel
- Using ATEM 1 M/E Advanced Panel
- ATEM Camera Control Panel
- Mixing Audio
- Help
- Regulatory Notices
- Safety Information
- Warranty

You are now on air! To check your broadcast, click on your account avatar and select ‘back to
Twitch’. Once in the main Twitch window, click your avatar icon again and select ‘channel’. You
will now see your broadcast on your channel and the live indicator will appear at the top of
the window.
NOTE If you are using additional ATEM control panels with your ATEM SDI, then you
might need a dedicated IP address. For more information, refer to the ‘connecting to a
network’ section.
Direct Streaming by Sharing Your Computer Internet
With ATEM Software Control now connected to your switcher, you can set up a direct stream via
your computer’s internet connection.
To set up your ATEM SDI Pro ISO or Extreme ISO for software control and direct streaming:
1 Plug your ATEM into your computer’s spare Ethernet port. It may take a moment for
DHCP to find the unit and assign an IP address.
2 Launch ATEM Software Control.
3 You will see your ATEM SDI Pro ISO or Extreme ISO listed as a connected ATEM
switcher on your network. Simply select your switcher from the list.
4 Click ‘connect’.
5 Configure your computer to share its internet connection through its Ethernet port.
Mac: in System Preferences, click ‘sharing’ then select ‘internet sharing’ from the
‘service’ list. In the ‘share your connection from’ menu, choose ‘wi-fi’ if your Mac is
connected to the internet over wifi. In the ‘to computers using’ list, select ‘ethernet’.
In the ‘service’ list, tick the ‘internet sharing’ checkbox. When you are asked if you are
sure you want to turn on internet sharing, click ‘start’.
Windows: in the Windows search box, type ‘view network connections’ and press
enter. Right click on the internet connection and select ‘properties’. On the ‘sharing’ tab,
tick ‘allow other network users to connect through this computer’s internet connection’.
Select a network connection in the menu then click ‘OK’.
ATEM Software Control will now appear with buttons and indicators illuminated. You can now
operate your switcher the same way you would via USB-C. Your ATEM switcher is now setup for
direct streaming via your computer.
Smartphone Tethering
Once you have set up your ATEM SDI Pro ISO or Extreme ISO to stream to YouTube, Twitch or
other platforms, you can now direct stream using your smartphone. This means you can set
up fast and be streaming to the world in any location where your smartphone has a 4G or 5G
cellular connection or is capable of reverse tethering your WiFi connection.
1 Simply connect a cable from your smartphone to the USB-C port on your switcher.
2 Once connected, make sure your smartphone device has hotspot activated.
On your iOS device open settings> personal hotspot and make sure ‘allow others to join’
option is on.
18Additional Features on ISO Models