
User Manual
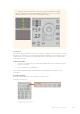
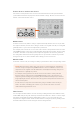
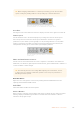
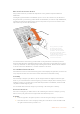
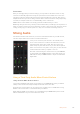
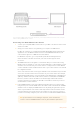
Table Of Contents
- Getting Started
- Switching your Production
- Additional Features on ISO Models
- ATEM SDI Extreme ISO
- ATEM Software Control
- Switching Modes
- Using ATEM Software Control
- Media Manager
- Audio Mixer
- Camera Control
- Using the Software Control Panel
- Transition Control and Upstream Keyer
- Downstream Keyers
- Processing Palettes
- Media Player Tab
- Output Tab
- Recording ISO Files
- Timecode Generator
- Using the Audio Mixer
- Shaping your Audio Mix using Advanced Fairlight Controls
- Using the 6 Band Parametric Equalizer
- Fairlight Controls Workflow Guide
- Using the Media Page
- Navigating the Browse Window
- ATEM Media Pool
- Image File Types
- Creating a TGA File with an Alpha Channel
- Camera Control
- Using Macros
- Changing Switcher Settings
- ATEM Setup Settings
- Using Adobe Photoshop with ATEM
- Using Multiple Control Panels
- Connecting to a Network
- Connecting to an Internet Router
- Keying using ATEM SDI
- Streaming Video
- HyperDeck Control
- ATEM 1 M/E Advanced Panel
- Using ATEM 1 M/E Advanced Panel
- ATEM Camera Control Panel
- Mixing Audio
- Help
- Regulatory Notices
- Safety Information
- Warranty

You can now lean the joystick all the way up and down and the gain will never rise higher than
the limit you have set.
TIP When the coarse control is combined with the sensitivity control, you can define
an upper and lower limit to the gain control.
For example, imagine you want to limit the gain so it never rises above f4.0 because
gain above that level will clip highlights in your image. You also want to limit the gain so
its minimum setting will be f8.0 to maintain the optimum sharpness range for your lens.
To do this:
1 Increase the gain control to its maximum position by leaning the joystick all the way
to its top position.
2 Now decrease the coarse setting until it reaches the upper limit you want to set.
Inthiscase, f4.0.
3 To set the lower limit, lean the joystick all the way to its bottom position.
4 Now increase the sensitivity setting until the gain reaches the lower limit you want
to set. In this case, f8.0.
Now you can lean the joystick all the way from top to bottom and the gain will stay
within the limits you have set. This is a powerful way to define your exposure limits,
plus gain finer control with the joystick due to allowing its maximum travel forwards
and backwards.
Iris and Master Black Active
Once your levels are set and you want to lock them so they are not accidentally changed,
pressthe ‘iris/MB active’ button. This enables a lock on the gain and master black so that any
accidental movements of the joystick will not affect your settings. The ‘Iris/MB active’ button
label will illuminate red when the lock is active. To disable the lock, press the button again.
TIP You can lock the black/pedestal level independently by disabling the ‘master
black’ option in the ‘settings’ menu. When disabling master black, the black level is
locked but the iris/gain level can still be adjusted. Don’t forget to enable the master
black setting if you want to make changes to the black/pedestal level.
Auto Iris
If your camera is using a compatible lens with electronic iris control via the camera, then you
can press the ‘auto iris’ button for a quick automatic exposure setting. The camera will set
exposure based on average brightness, providing an average exposure that is a balance
between the brightest highlights and the darkest shadows.
Call
Holding down the ‘call’ button will flash the tally light on the CCU’s selected camera. This is a
helpful way of seeking the camera operators’ attention, or to let your operators know you are
about to go live.
While holding down the call button, the large camera number next to the joystick will also flash
so you can visually confirm the call is being sent.
177ATEM Camera Control Panel