
User Manual
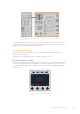
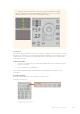
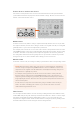
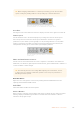
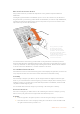
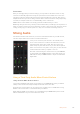
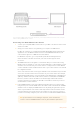
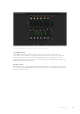
Table Of Contents
- Getting Started
- Switching your Production
- Additional Features on ISO Models
- ATEM SDI Extreme ISO
- ATEM Software Control
- Switching Modes
- Using ATEM Software Control
- Media Manager
- Audio Mixer
- Camera Control
- Using the Software Control Panel
- Transition Control and Upstream Keyer
- Downstream Keyers
- Processing Palettes
- Media Player Tab
- Output Tab
- Recording ISO Files
- Timecode Generator
- Using the Audio Mixer
- Shaping your Audio Mix using Advanced Fairlight Controls
- Using the 6 Band Parametric Equalizer
- Fairlight Controls Workflow Guide
- Using the Media Page
- Navigating the Browse Window
- ATEM Media Pool
- Image File Types
- Creating a TGA File with an Alpha Channel
- Camera Control
- Using Macros
- Changing Switcher Settings
- ATEM Setup Settings
- Using Adobe Photoshop with ATEM
- Using Multiple Control Panels
- Connecting to a Network
- Connecting to an Internet Router
- Keying using ATEM SDI
- Streaming Video
- HyperDeck Control
- ATEM 1 M/E Advanced Panel
- Using ATEM 1 M/E Advanced Panel
- ATEM Camera Control Panel
- Mixing Audio
- Help
- Regulatory Notices
- Safety Information
- Warranty

TIP When changing a white balance or shutter speed setting, you can increase their
speed of change by holding down the corresponding up or down arrow buttons.
Hold down the W/B button and press the shutter up and
down arrow buttons to set a white balance in degrees Kelvin
Color Bars
Pressing the ‘bars’ button will set the camera to display color bars. Press again to turn bars off.
Shutter Speed
The arrow buttons next to the shutter display let you change the camera’s shutter speed.
Pressthe up arrow to increase the shutter speed and down to decrease. For general
production use, the shutter speed is typically set to 50, meaning 1/50th of a second, which
produces a pleasing motion blur. If you want crisper images with reduced motion blur, for
example when shooting sport, a faster shutter speed may be preferred.
Press the shutter up and down buttons to set the camera’s
shutter speed
White and Black Balance Controls
The two rows of color balance knobs are used to adjust the color balance of the white and
black levels, also known as gain and pedestal. Turn the red, green and blue knobs clockwise or
counter clockwise to make changes.
TIP For achieving accurate color settings while adjusting the color balance, it’s best
to view scopes. For example, a waveform, parade or vectorscope as provided on a
Blackmagic SmartScope 4K.
Black/Flare Button
Adjust the color of the gamma or mid tones by holding down the black/flare button and
adjusting the black balance RGB controls.
D EXT/EXT
This feature will be enabled in a future update.
Camera Number
Each CCU has its own large camera number that shows you which camera is being controlled.
This large display is illuminated green when in a neutral state and red when its camera is
switched to the program output.
175ATEM Camera Control Panel