
User Manual
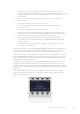
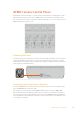
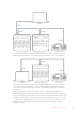
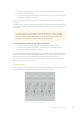
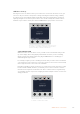
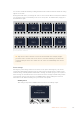
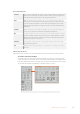
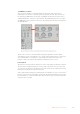
Table Of Contents
- Getting Started
- Switching your Production
- Additional Features on ISO Models
- ATEM SDI Extreme ISO
- ATEM Software Control
- Switching Modes
- Using ATEM Software Control
- Media Manager
- Audio Mixer
- Camera Control
- Using the Software Control Panel
- Transition Control and Upstream Keyer
- Downstream Keyers
- Processing Palettes
- Media Player Tab
- Output Tab
- Recording ISO Files
- Timecode Generator
- Using the Audio Mixer
- Shaping your Audio Mix using Advanced Fairlight Controls
- Using the 6 Band Parametric Equalizer
- Fairlight Controls Workflow Guide
- Using the Media Page
- Navigating the Browse Window
- ATEM Media Pool
- Image File Types
- Creating a TGA File with an Alpha Channel
- Camera Control
- Using Macros
- Changing Switcher Settings
- ATEM Setup Settings
- Using Adobe Photoshop with ATEM
- Using Multiple Control Panels
- Connecting to a Network
- Connecting to an Internet Router
- Keying using ATEM SDI
- Streaming Video
- HyperDeck Control
- ATEM 1 M/E Advanced Panel
- Using ATEM 1 M/E Advanced Panel
- ATEM Camera Control Panel
- Mixing Audio
- Help
- Regulatory Notices
- Safety Information
- Warranty

ATEM Camera Control Panel
Traditionally, camera control units, or CCUs, have been designed for mounting inside a desk
with independent units for each camera. ATEM Camera Control Panel is a portable solution
that can be placed on a desk or solid surface with 4 CCUs built in so you can control up to four
Blackmagic Design cameras at once.
Powering the Panel
To power your camera control panel, connect power via the IEC power input on the rear panel
using a standard IEC power cable. You can also use the 12V DC input if you want to connect
external power or redundancy via an external power supply, for example a UPS uninterrupted
power supply or external 12V battery.
Connect power via the power input on the rear panel
Connecting the Panel to your Switcher
To connect ATEM Camera Control Panel to your switcher, all you need to do is add the panel
into your ATEM Ethernet connection chain.
For example, if you are using an external ATEM hardware panel, such as the ATEM 1 M/E
Advanced Panel, remove its Ethernet cable from your computer or network and connect it to
one of the camera control panel’s Ethernet ports instead. The ATEM hardware panel will then
be the middle unit in the chain. Now connect the camera control panel’s spare Ethernet port to
your computer or network.
162ATEM Camera Control Panel