
User Manual
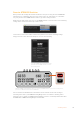
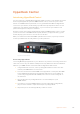
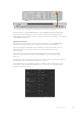
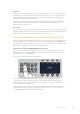
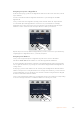
Table Of Contents
- Getting Started
- Switching your Production
- Additional Features on ISO Models
- ATEM SDI Extreme ISO
- ATEM Software Control
- Switching Modes
- Using ATEM Software Control
- Media Manager
- Audio Mixer
- Camera Control
- Using the Software Control Panel
- Transition Control and Upstream Keyer
- Downstream Keyers
- Processing Palettes
- Media Player Tab
- Output Tab
- Recording ISO Files
- Timecode Generator
- Using the Audio Mixer
- Shaping your Audio Mix using Advanced Fairlight Controls
- Using the 6 Band Parametric Equalizer
- Fairlight Controls Workflow Guide
- Using the Media Page
- Navigating the Browse Window
- ATEM Media Pool
- Image File Types
- Creating a TGA File with an Alpha Channel
- Camera Control
- Using Macros
- Changing Switcher Settings
- ATEM Setup Settings
- Using Adobe Photoshop with ATEM
- Using Multiple Control Panels
- Connecting to a Network
- Connecting to an Internet Router
- Keying using ATEM SDI
- Streaming Video
- HyperDeck Control
- ATEM 1 M/E Advanced Panel
- Using ATEM 1 M/E Advanced Panel
- ATEM Camera Control Panel
- Mixing Audio
- Help
- Regulatory Notices
- Safety Information
- Warranty

HyperDeck Control
Introducing HyperDeck Control
You can connect up to four Blackmagic HyperDeck disk recorders to your switcher and control
them using the HyperDecks palette in ATEM Software Control, or from the system control
buttons on an ATEM advanced panel. This is a very powerful feature! With four HyperDecks
connected to your switcher, it’s like having a portable videotape department able to record
outputs from your switcher, play back graphics, or you can even set your switcher to roll
prerecorded segments at the press of a button!
Transport controls are located in the HyperDecks palette in ATEM Software Control, or in the
system control menu on an ATEM advanced panel, which lets you play back video, jog and
shuttle, skip clips, pause and more. You can also record video.
When you combine this feature with ATEM’s powerful macros feature, it opens up a world of
creative possibilities that can really enhance your live production!
HyperDeck Studio HD Plus
Connecting HyperDecks
Connecting Blackmagic HyperDecks to your switcher is very similar to connecting cameras and
other video sources via your switcher’s SDI inputs. The only additional connection is Ethernet
which lets your ATEM switcher communicate with the HyperDeck disk recorder.
1 Using the Ethernet connector, connect your HyperDeck disk recorder to the same
network your ATEM switcher is connected to.
2 Press the remote button marked ‘REM’ on the HyperDeck’s control panel. The ‘REM’
button will illuminate which means the HyperDeck has remote control enabled. If
you are using a HyperDeck Studio HD Mini, turn remote on via the settings tab on
the LCD menu.
3 Plug the SDI output of your HyperDeck into one of the SDI inputs of your
ATEM switcher.
4 If you want to record your ATEM switcher’s program output with your HyperDeck,
plugone of the switcher’s outputs into the input of your HyperDeck.
5 Repeat the process for each HyperDeck you want to connect.
135HyperDeck Control