
User Manual
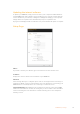
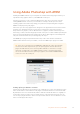
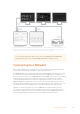
Table Of Contents
- Getting Started
- Switching your Production
- Additional Features on ISO Models
- ATEM SDI Extreme ISO
- ATEM Software Control
- Switching Modes
- Using ATEM Software Control
- Media Manager
- Audio Mixer
- Camera Control
- Using the Software Control Panel
- Transition Control and Upstream Keyer
- Downstream Keyers
- Processing Palettes
- Media Player Tab
- Output Tab
- Recording ISO Files
- Timecode Generator
- Using the Audio Mixer
- Shaping your Audio Mix using Advanced Fairlight Controls
- Using the 6 Band Parametric Equalizer
- Fairlight Controls Workflow Guide
- Using the Media Page
- Navigating the Browse Window
- ATEM Media Pool
- Image File Types
- Creating a TGA File with an Alpha Channel
- Camera Control
- Using Macros
- Changing Switcher Settings
- ATEM Setup Settings
- Using Adobe Photoshop with ATEM
- Using Multiple Control Panels
- Connecting to a Network
- Connecting to an Internet Router
- Keying using ATEM SDI
- Streaming Video
- HyperDeck Control
- ATEM 1 M/E Advanced Panel
- Using ATEM 1 M/E Advanced Panel
- ATEM Camera Control Panel
- Mixing Audio
- Help
- Regulatory Notices
- Safety Information
- Warranty
Preparing Graphics for Upload
For best results, you will want to use a Photoshop document resolution that matches the video
standard you’re using with your ATEM switcher. For 1080 HD you should use 1920 x 1080 pixels
in resolution. For 720p HD formats you should use 1280 x 720 pixels.
When working with Photoshop documents for ATEM, you should not put any content on the
background layer, but add all content to the layers above. The background layer should always
be plain full frame black, and you should use a pre multiplied key setting in the ATEM keyer for
keying graphics from Photoshop.
Using Multiple Control Panels
All ATEM SDI switchers have multiple ways they can be controlled and you can use this
software control panel as well as a range of hardware control panels. In fact, if you connect your
ATEM switcher to a network that has other computers connected, you can run multiple copies
of this software control panel. This means you could have someone operating the switcher,
while someone else could be controlling cameras, managing media or mixing audio. It’s quite
flexible and this means many people can be operating your ATEM SDI all at the same time!
A good example is the relationship between the software control panel, external
ATEM hardware control panel and the control panel of your ATEM SDI. The software control
panel has been designed to be the same as the external ATEM hardware control panel. This is a
convention and well understood ME style of layout where you have a program row and preview
row of input controls and then a transition block that lets you command the transition.
If you plug in both control panels, you can see them mirror each other and any button pressed
on one control panel will be reflected on the other control panels instantly.
However, due to space limitations the control panel of ATEM SDI is a little bit different and it’s
interesting to see the relationship between how this control panel works and how the software
control panel works. A good way to understand this is to watch your ATEM SDI’s panel control
while controlling the switcher via the software control panel.
Because of the limited space on ATEM SDI’s control panel, both the program and preview
rows have been combined together into a single row of buttons. When running your ATEMSDI
in program preview switching mode, you can see the source selected on the program row
because it’s illuminated red and the source selected on the preview row because it’s selected
green. These are the same colors as the software control panel, but they are just on the same
row of physical buttons.
The following section describes how to connect your ATEM equipment to a network so you
can operate your switcher using an ATEM hardware panel and multiple computers running
ATEM Software Control.
97Using Multiple Control Panels