
User Manual

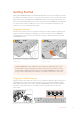
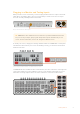
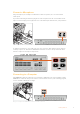
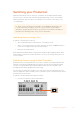
Table Of Contents
- Getting Started
- Switching your Production
- Additional Features on ISO Models
- ATEM SDI Extreme ISO
- ATEM Software Control
- Switching Modes
- Using ATEM Software Control
- Media Manager
- Audio Mixer
- Camera Control
- Using the Software Control Panel
- Transition Control and Upstream Keyer
- Downstream Keyers
- Processing Palettes
- Media Player Tab
- Output Tab
- Recording ISO Files
- Timecode Generator
- Using the Audio Mixer
- Shaping your Audio Mix using Advanced Fairlight Controls
- Using the 6 Band Parametric Equalizer
- Fairlight Controls Workflow Guide
- Using the Media Page
- Navigating the Browse Window
- ATEM Media Pool
- Image File Types
- Creating a TGA File with an Alpha Channel
- Camera Control
- Using Macros
- Changing Switcher Settings
- ATEM Setup Settings
- Using Adobe Photoshop with ATEM
- Using Multiple Control Panels
- Connecting to a Network
- Connecting to an Internet Router
- Keying using ATEM SDI
- Streaming Video
- HyperDeck Control
- ATEM 1 M/E Advanced Panel
- Using ATEM 1 M/E Advanced Panel
- ATEM Camera Control Panel
- Mixing Audio
- Help
- Regulatory Notices
- Safety Information
- Warranty

Switching your Production
Switch cleanly between sources using cuts or transitions. A cut will immediately change
from one source to another and a transition will gradually change sources over a defined
duration. Transitions appear as effects, for example a cross dissolve or mix, a dip to color,
orastylized wipe.
TIP There are two switching modes available on your ATEM SDI. The default mode
is ‘cut bus’ which lets you change sources as soon as you press an input button.
Changing to ‘program preview’ mode lets you preview a source before switching it to
air. Refer to the ‘switching modes’ section for more information.
Switching Sources using a Cut
To perform a cut from input 1 to input 2:
1 Input 1 is illuminated red to indicate input 1 is currently live on air.
2 Select a ‘cut’ by pressing the ‘cut’ button. Pressing ‘cut’ tells your ATEM SDI that you
want to use a straight cut instead of an auto transition.
3 Now press the input 2 button.
Input 1 will now immediately switch to input 2 and you will see input 2 illuminated red, which
means input 2 is now live on air. This is known as a cut as you are ‘cutting’ directly from one
source to another.
Switching Sources using an Auto Transition
Transitions let you smoothly switch from one source to another over a defined duration. For
example, a mix transition gradually fades the current source into the next until the original
source is no longer visible. A wipe transition will move a line across the original source
revealing another effectively wiping across the image.
You can add a colored border, or make it soft so the edge is smooth and pleasing. You can
even use digital video effects or DVEs, such as a squeeze or push, to move the images as they
transition from one to the other.
To perform a mix auto transition from input 1 to input 2:
1 Press the ‘mix’ button to select a mix transition.
9Switching your Production