
User Manual
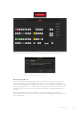
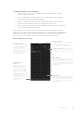
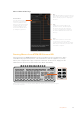
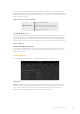
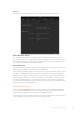
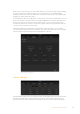
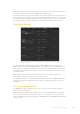
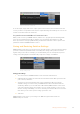
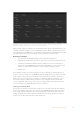
Table Of Contents
- Getting Started
- Switching your Production
- Additional Features on ISO Models
- ATEM SDI Extreme ISO
- ATEM Software Control
- Switching Modes
- Using ATEM Software Control
- Media Manager
- Audio Mixer
- Camera Control
- Using the Software Control Panel
- Transition Control and Upstream Keyer
- Downstream Keyers
- Processing Palettes
- Media Player Tab
- Output Tab
- Recording ISO Files
- Timecode Generator
- Using the Audio Mixer
- Shaping your Audio Mix using Advanced Fairlight Controls
- Using the 6 Band Parametric Equalizer
- Fairlight Controls Workflow Guide
- Using the Media Page
- Navigating the Browse Window
- ATEM Media Pool
- Image File Types
- Creating a TGA File with an Alpha Channel
- Camera Control
- Using Macros
- Changing Switcher Settings
- ATEM Setup Settings
- Using Adobe Photoshop with ATEM
- Using Multiple Control Panels
- Connecting to a Network
- Connecting to an Internet Router
- Keying using ATEM SDI
- Streaming Video
- HyperDeck Control
- ATEM 1 M/E Advanced Panel
- Using ATEM 1 M/E Advanced Panel
- ATEM Camera Control Panel
- Mixing Audio
- Help
- Regulatory Notices
- Safety Information
- Warranty

input names support up to 20 characters and are displayed in various menu selection boxes on
the software control panel and on the ATEM advanced panel displays.
To change an input name, click in the text field, enter the text and click ‘save’. The input name
will be updated on the software control panel and external hardware panel if one is connected.
It’s a very good idea to change both the short and long labels at the same time, so they match.
For example Camera 1 would be entered in as a long label, and CAM1 as the short label.
HyperDeck Settings
HyperDeck settings
You can connect up to 4 Blackmagic HyperDeck Studio disk recorders to a network via
Ethernet and control them using ATEM Software Control. When connecting HyperDecks, use
these settings to configure the IPAddress, select the inputs your HyperDecks are connected
to, turn the auto roll feature for each deck on or off, and set their frame offset settings so they
can switch cleanly.
Status indicators appear above and below each deck so you can easily see if they are
successfully connected and if their remote buttons are active.
For detailed information on setting up Blackmagic HyperDecks with your ATEM switcher and
setting the ‘HyperDeck’ configuration settings, refer to the ‘HyperDeck control’ section of
this manual.
Setting the Output Source
Your ATEM SDI’s outputs can have various sources routed to them. For example all video
inputs, program and preview.
ATEM SDI Pro ISO and Extreme ISO switchers also have a powerful multiview feature which
lets you monitor all your input sources and outputs on one single screen. You can read more
about the multiview in the ‘additional features on ATEM SDI Pro ISO and ATEM SDI Extreme ISO’
section. section.
88Changing Switcher Settings